Watermarked files
[ ] ToDo: initial description, recheck content
- Watermark
A watermarked replacement file will be created once when uploading or when viewed the first time. The watermarking will be a text defined in the configuration. Optional: Add icon or other image as watermark. (This has to be developed. It can be done in short time. Send us an email if you need it and we will care for it)
- Disguise watermarked file names
Additional the created watermarked files are disguised with a different filename. So users can't immediately guess the URL of the next or previous image. So it is harder to download all your images and remove the watermark with an imaging application
Drawbacks
- The small sized "display" files have no watermark
- The "display" files can be found with guessing and a knowledge of the RSGallery2 / Joomla structure
- If you switch on watermarking after uploading the images then the watermarking tries to use the original image. If it doesn't exist then it uses the "display" files with lower resolution.
Setup watermarked configuration:
- Hide (delete) original after upload

In configuration->images->section "Image storage"
- (1) activate the "no" selection
- Check "display" resolution
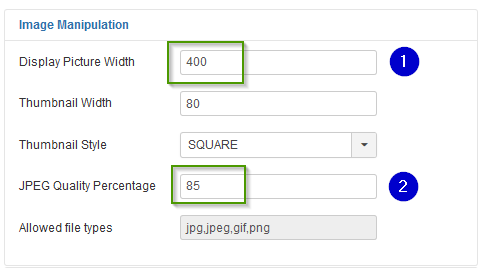
In configuration->images->section "Image manipulation"
- (1) Display picture width defines the maximum size of the displayed image.
- (2) You can reduce the quality of the displayed image to your needs
- Check watermark settings
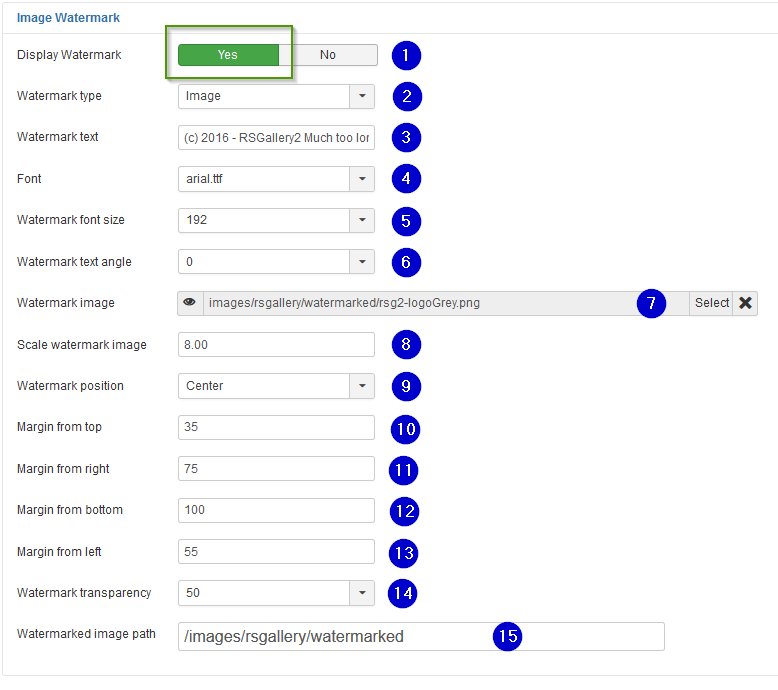
In configuration->display->section "Image watermark"
- (1) Display watermark Activate if watermarked files should be used on "big size" image view. It will replace the original file which would be displayed otherwise. A watermarked replacement file will be created once when uploading or when viewed the first time. The watermarking will be a text defined in the configuration. Optional: Add icon or other image as watermark. (This has to be developed. It can be done in short time. Send us an email if you need it and we will care for it)
- (2) Watermark type A text or an image can be merged into the original image as a watermark
- (3) Watermark text Define the text to be displayed in the image
- (4) Font Select the font type of the watermark text
- (5) Watermark font size Select the font size of the watermark text
- (6) Watermark text angle Define the angle of the watermark text
- (7) Watermark image Will be merged into the big display image. Watermark image should be smaller then display image"
- (8) Scale watermark image Enter a factor to enlarge the watermark image. 1.0 will use the original. Smaller values will reduce the watermark image size
- (9) Watermark position Select the position of the watermark text.
- (10) Margin from top
- (11) Margin from right
- (12) Margin from bottom
- (13) Margin from left Margin from the border of the original image. Watermark is placed with distance to the border, if it is not centrally located
- (14) Watermark transparency Define transparency of the text to be displayed in the image
- (15) Watermark image path Define the destination path of the created watermarked files
How to hide the original image from the user
Intention:
You want to show your images to the customers but the customer shouldn't be able to download in original resolution. The RSGallery2 supports this with some small drawbacks.
We can't avoid that every image that is shown in the browser the user can download which is not what you want.
Solutions:
- Prevent showing the original image on double click on the image
- Automatic remove the original size image file after upload
- Display a watermarked file instead of the original image
Display types in RSGallery2
- "Thumbs": Shown in gallery overview ==> No need for watermarking
- "Display": Single image view in slideshow and similar views ==> Expected to be resized into lesser quality and therefore no watermark.
- "Original": A double click on a "display" image leads to a full screen "lightbox" image of the original file.
Solution "Popup style to none":
Configuration -> Tab "display" -> section "Image display" 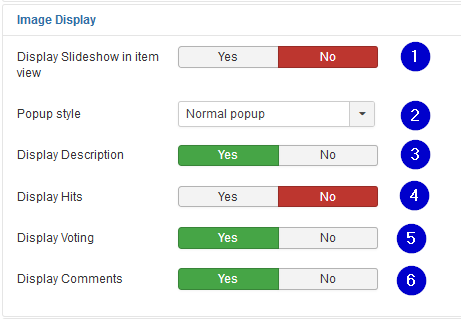
-
(2) Popup style Defines the method ("No popup", "Normal popup", "Joomla Modal") used for displaying a popup (big image) after a click of the image in single image display.
Possible selections:
- "No popup": A click on the image does not open a popup or display the "original" image in a separate window
- "Normal popup": After click on the image the original image is displayed in a separate browser window style
- "Joomla Modal": After click on the image a popup in a modal style with to close appear in front of the small image screen
Choose "No popup" to avoid the download of the original size image. Then the user will only see the small sized "display" image.
Drawback
- The "original" files can be found and opened in the browser with guessing if a knowledge of the RSGallery2 / Joomla structure exists.
This can be disguised using a different folder for originals (see configuration image below)
Solution "Automatic remove the original size image file":
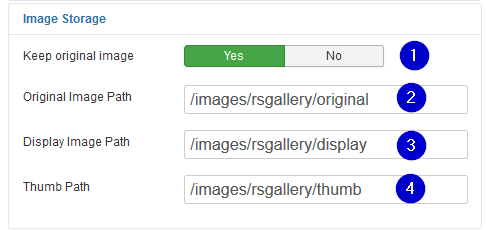
Configuration -> Tab "Image" -> section "Image Storage"
-
(1) Keep original image Yes / No
On "yes" the original image will be deleted after the upload process for server space or hiding purposes. On a double click of the display sized image the same image (size) appears then in the popup
Drawback:
Watermark images not created on upload will use the smaller size "display" image to be build when the user opens the 2original" view"
Solution "Watermarked files":
-
Resized display image (to bad quality) On upload the original image it is resized to display size defined in configuration. This reduces "interest" of your user to download with this bad quality
-
Watermark A watermarked replacement file will be created once when uploading or when viewed the first time. The watermarking will be a text defined in the configuration.
Optional: Add icon or other image as watermark. (This has to be developed. It can be done in short time. Send us an email if you need it and we will care for it) -
Disguise watermarked file names Additional the created watermarked files are disguised with a different filename. So users can't immediately guess the URL of the next or previous image. So it is harder to download all your images and remove the watermark with an imaging application
Drawbacks
- The small sized "display" files have no watermark
- The "display" files can be found with guessing and a knowledge of the RSGallery2 / Joomla structure
- If you switch on watermarking after uploading the images then the watermarking tries to use the original image. If it doesn't exist then it uses the "display" files with lower resolution.
Setup watermarked configuration:
- Hide (delete) original after upload
In configuration->images->section "Image storage"
- (1) activate the "no" selection
- Check "display" resolution
In configuration->images->section "Image manipulation"
- (1) Display picture width defines the maximum size of the displayed image.
- (2) You can reduce the quality of the displayed image to your needs
- Check watermark settings
In configuration->display->section "Image watermark"
- (1) Display watermark
Activate if watermarked files should be used on "big size" image view. It will replace the original file which would be displayed otherwise.
A watermarked replacement file will be created once when uploading or when viewed the first time. The watermarking will be a text defined in the configuration.
Optional: Add icon or other image as watermark. (This has to be developed. It can be done in short time. Send us an email if you need it and we will care for it) - (2) Watermark type
A text or an image can be merged into the original image as a watermark - (3) Watermark text
Define the text to be displayed in the image - (4) Font
Select the font type of the watermark text - (5) Watermark font size
Select the font size of the watermark text - (6) Watermark text angle
Define the angle of the watermark text - (7) Watermark image
Will be merged into the big display image. Watermark image should be smaller then display image" - (8) Scale watermark image
Enter a factor to enlarge the watermark image. 1.0 will use the original. Smaller values will reduce the watermark image size - (9) Watermark position
Select the position of the watermark text. - (10) Margin from top
- (11) Margin from right
- (12) Margin from bottom
- (13) Margin from left
Margin from the border of the original image. Watermark is placed with distance to the border, if it is not centrally located - (14) Watermark transparency
Define transparency of the text to be displayed in the image - (15) Watermark image path
Define the destination path of the created watermarked files