Galleries List View
Gallery list columns
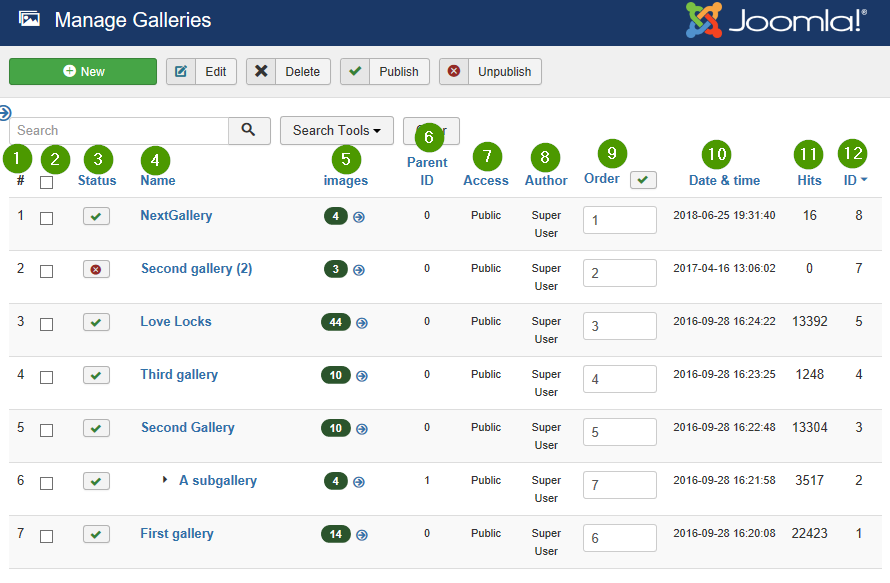
(1) Number in list
%
(2) Select gallery
The topmost rectangle selects all galleries which is useful for batch processing The selector beside the gallery information selects this gallery
(3) Status
A green 'OK' tell that the image is published. (Otherwise red)
(4) Gallery name
A click on the name leads to edit view of the selected gallery
(5) images
Tells the count of images inside the gallery
The arrow on the right side will open the image list view with the gallery images
(6) Parent ID
A sub gallery does tell about its parent gallery
(7) Access
%
(8) Author
The author logged in when creating the gallery
(9) Gallery order
(1) Order number
The order number of the gallery may be increased or decreased or set manually.
(2) Save Order
On click the order numbers are saved. Any mismatch like double entries will be aligned
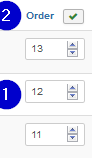
Example:
Exchange numbers: Previous: A:12 B:11 C:13. Write destination numbers and click save into the three controls. Result: A:11 B12: C:13
(3) Ordering of sub galleries
The sub gallery order number is dependend on the place (order) of the parent gallery. A sub gallery will always be ordered direct behind the parent gallery.
(10) Date & time
Creation Time of gallery
(11) Hits
Count of views / appearances
(12) ID
Internal ID of image for reference or matching in other list
Gallery(s) task buttons
(1) New
Creates a new gallery. Leads to edit view of the new selected image
(2) Edit
Leads to edit view of one selected gallery
(3) Delete
Will delete all selected items. On yes of the follow up question the image is deleted. Attention it is deleted immediately and not saved in the trash
(4) Publish
Assign published to the selected images
(5) Unpublish
Assign unpublished to the selected images
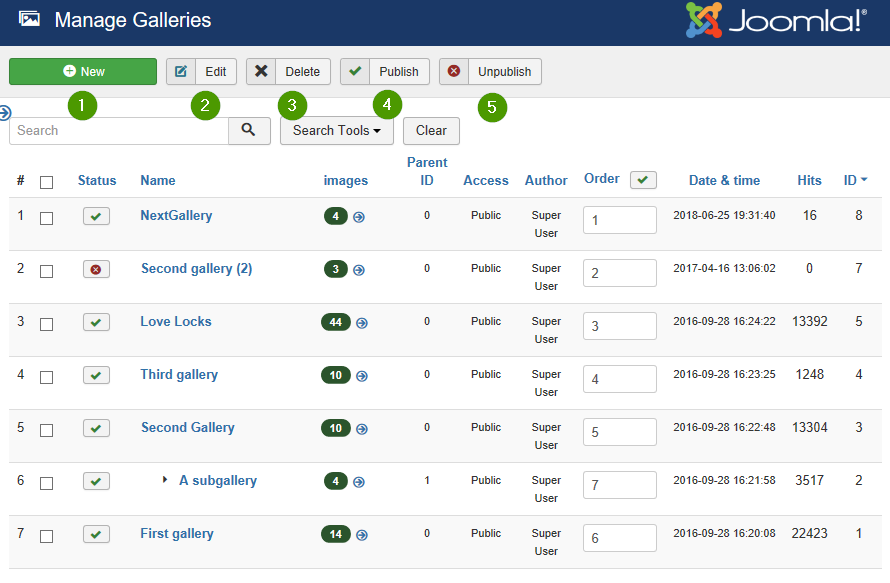
Galleries search options
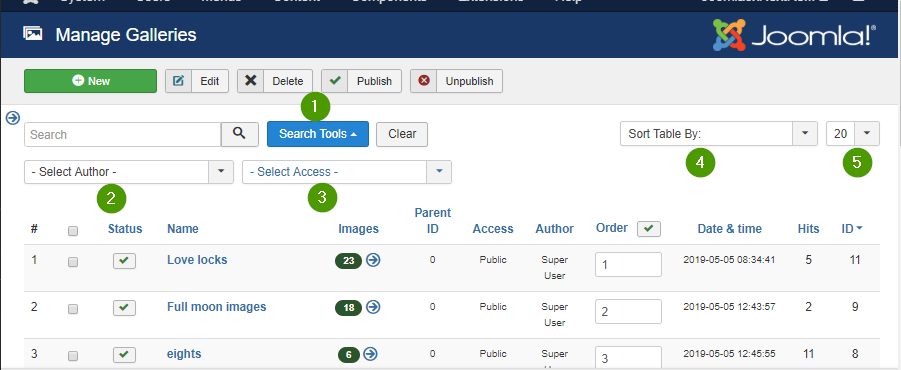
(1) Activate search controls
(2) Select author
Only galleries of the selected author will be shown
(3) Select access type
Only galleries of the selected access type will be shown.
Types: Public, Guest, Registered, Special, Super users
(4) Columns sorting
Defines the column the list will be sorted by and also the direction
(5) Limit per page
It defines the count of image which will be shown on one page
Galleries Edit View
##
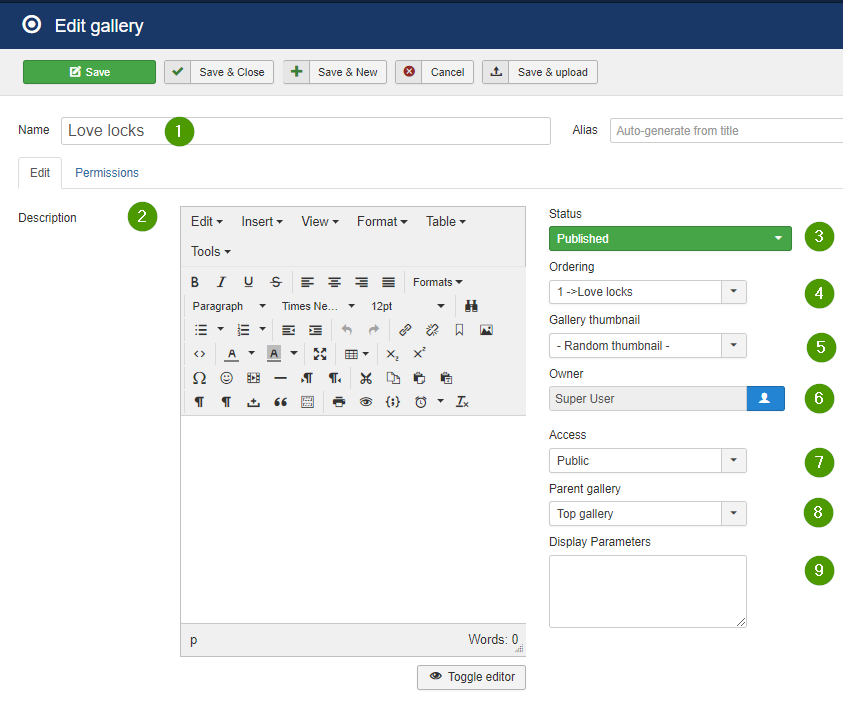
(1) Gallery name
%
(2) Description
Text which is displayed in the gallery view if enabled in the configuration
(3) Status
Publish or hide the gallery
(4) Ordering
Change appearance order
(5) Gallery thumbnail
Select random mode or a image thumb to represent the gallery
(6) Owner
Tells user who created the gallery
(7) Access
Types: Public, Guest, Registered, Special, Super users
(8) Parent gallery
Tells the name of the parent Gallery
- Top gallery: The gallery has no parent
(9) Display parameters
Add parameters used in display of the gallery to overwrite settings from the configuration for this gallery.
Use the form of Name='value', one assignment per line.
Sadly the name of the item has to be derived from the config control name.
(10)
%
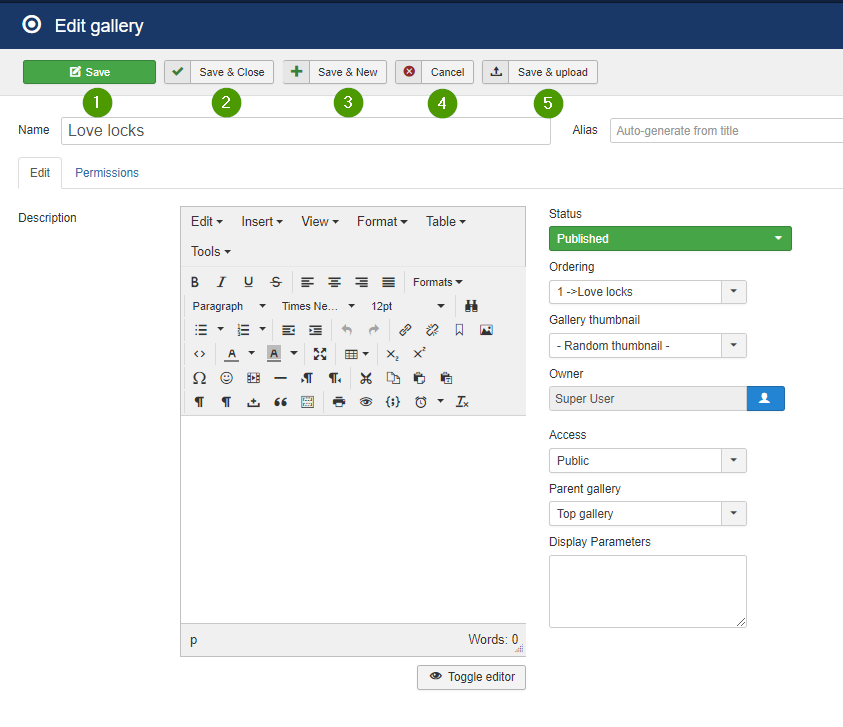
(1) Save
Saves the changes
(2) Save and close
Saves the changes and exits the edit view
(3) Save and new
Saves the changes and opens an empty edit view
(4) Cancel
Exits the edit view
(5) Save & upload
Saves the changes and goto the upload image view
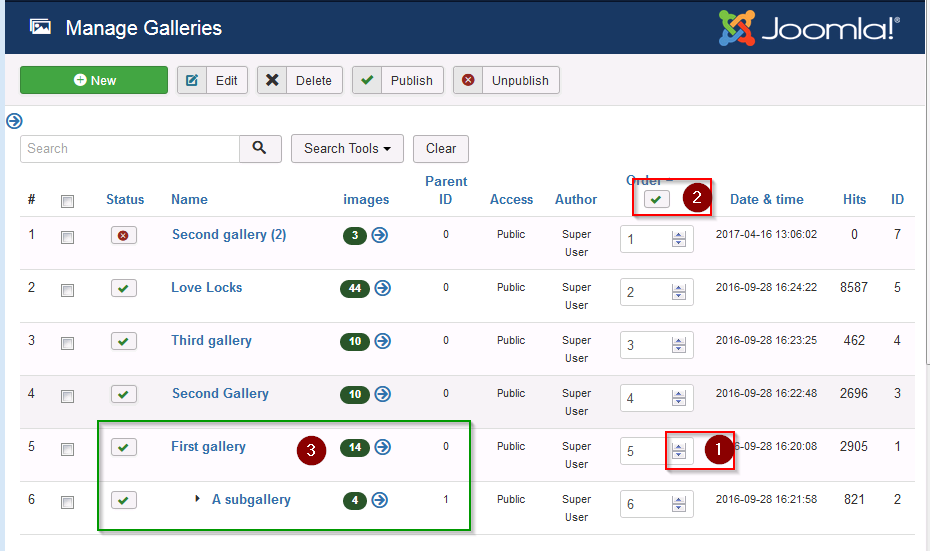
Change Ordering
(1) Click on up and down of the order controls or change the value there.
(2) Use the green "OK" button to write the changes to the database
See following image
The sorting depends on parents and child galleries. Child galleries will be ordered direct behind their parent. This applies also to sub - childs when the parent is a child itself. Then a cascade of childs and sub childs will follow the first parent.
(3) While changing the "first gallery" from 5 down to 2 the child gallery "a subgallery" will always follow having a ordering with 1 higher. Result see below
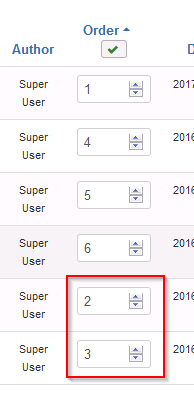
Sadly this has a side effect. If you try to increase the parent gallery ordering it will not go up through clicking. You may set te value by key which works when leaving the control.
Images list view
Image list columns

(1) Number in list
%
(2) Select image
The topmost rectangle selects all images which is useful for batch processing The selector beside the image information selects this image
(3) Status
A green 'OK' tell that the image is published. (Otherwise red)
(4) Image title
Title displayed to user in views if enabled.
The title of the image may be different to the image file name. It will be preset with image name on upload and changes with the property edit or on single image edit.
(5) Image name
Real file name used on the server
(6) Parent gallery name
Each image is assigned to a gallery
(7) Image order
(1) Order number
The order number of the image may be increased or decreased or set manually.
(2) Save Order
On click the order numbers are saved. Any mismatch like double entries will be aligned
Example:
Exchange numbers: Previous: A:12 B:11 C:13. Write destination numbers and click save into the three controls. Result: A:11 B12: C:13
(8) Date and time
The date and time will be assigned on upload with the upload time
(9) Votes
The value will be between 0..5. It is calculated by Rating / Votes
(11) Rating
Total of all votes
(12) Hits
Count of views / appearances
(13) ID
Internal ID of image for reference or matching in other list
(14a) !!! Hover on image title
Hovering over the image title will show the thumb of the image as tool tip
(14b) !!! Click on image title
A click on the image title will lead to the edit view of the image
Image(s) task buttons
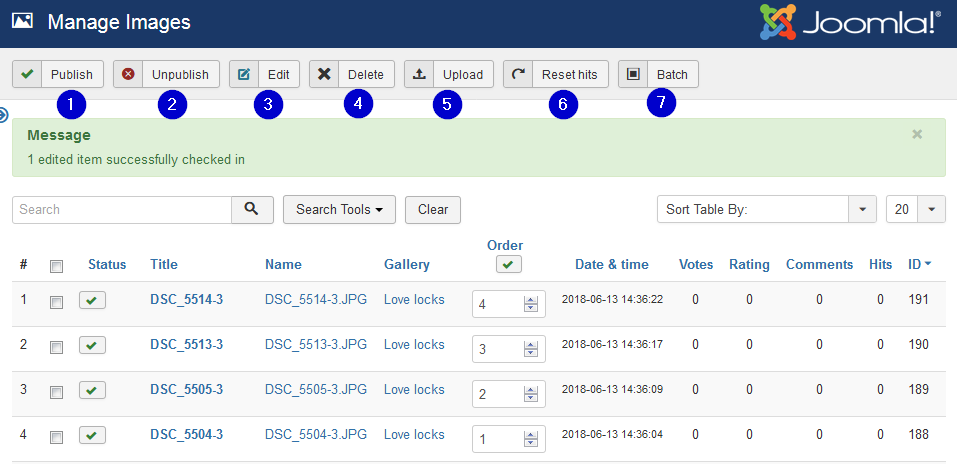
(1) Publish
Assign published to the selected images
(2) Unpublish
Assign unpublished to the selected images
(3) Edit
Leads to edit view of one selected image
(4) Delete
Will delete all selected items. On yes of the follow up question the image is deleted. Attention it is deleted immediately and not saved in the trash
(5) Upload
Go to the upload, Go directly there. Do not go over the control panel ;-)
(6) Reset Hits
Resets the hits of the selected Images
(7) Batch
Add the selected images to the task list and start the batch form
Possible batch tasks:
- Move image(s) to gallery
- Copy image(s) to gallery
- Add (change) properties to image(s)
See below
Image(s) search options
The search options follow the standard search behavior of Joomla!
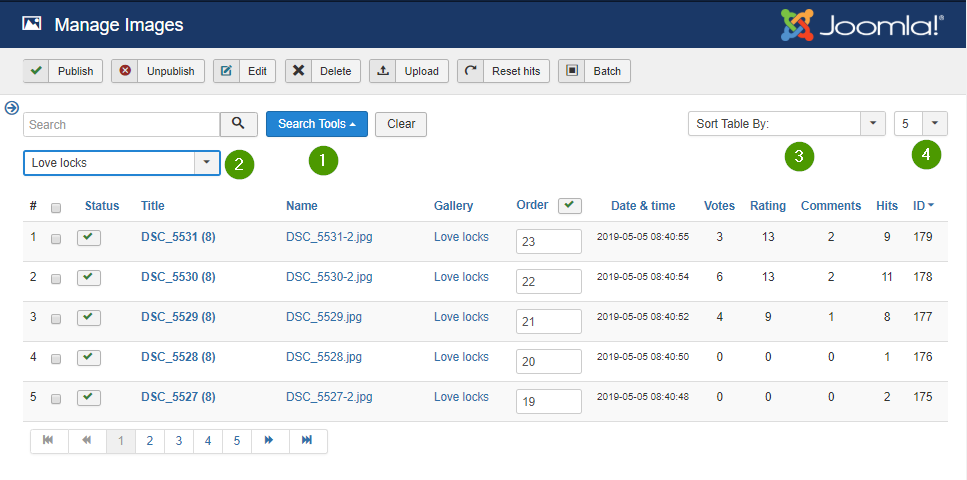
(1) Activate search controls
(2) Select gallery
Only image of the selected gallery will be shown
(3) Columns sorting
Defines the column the list will be sorted by and also the direction
(4) Limit per page
It defines the count of image which will be shown on one page
Images: Batch process to add properties
In the images list view images can be selected for batch processing. The following image shows the possible selections which appear after clicking the batch button
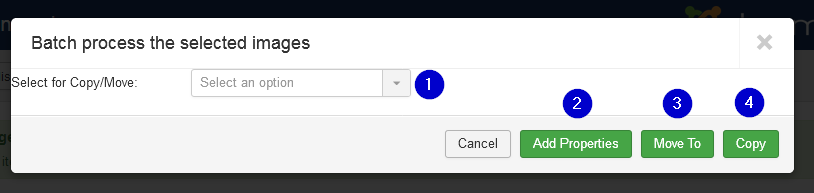
(1) Select Gallery
Select a gallery as destination for copy or move of selected images
(2) Add properties
This button leads to the properties form (See below) and will open the selected images. The title and description can be changed for a batch of images. also image can be flipped and rotated there.
(3) Move to
Batch processing: The selected images can be moved to the selected gallery
(4) Copy to
Batch processing: The selected images can be copied to the selected gallery
Properties uploaded Files
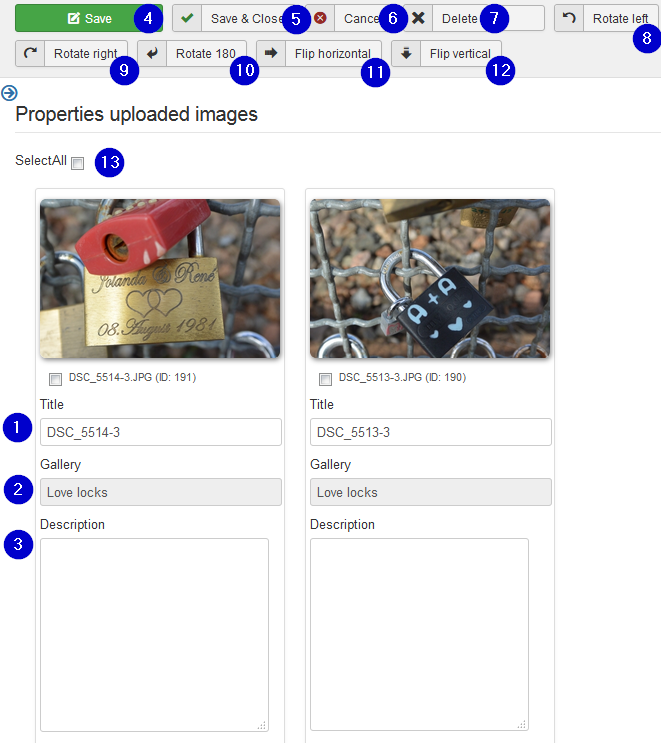
This form enables to set the properties title and description for a batch of images at the same time. It is normally reached over the upload form. It can also be reached with selected images over the batch button in the images list form
(1) Title
The title is preset on creation. It may be edited here. The title may be different to the uploaded image name when the name already existed. Then the next free number is appended.
(2) Gallery
The gallery name can't be changed in this part
(3) Description
The description may be changed with the standard editor like in the edit single image form. Sadly this leads to a very high edit block which creates a ugly layout.
(4) Save
Save changes and continue edit on the same images
(5) Save & Close
Save changes and leave the form to the image list
(6) Cancel
Ignore the changes and leave the form
(7) Delete
All or some image can be selected for deleting. (See (8) and (9)) Clicking on the delete button will delete the selected images from the RSGallery2 database and the created image files
(8) Rotate left
Rotates selected images 90 degrees against the clock
(9) Rotate right
Rotates selected images 90 degrees with the clock
(10) Rotate 180
Rotates selected images 180 degrees.
(11) Flip horizontal
Flips the selected images horizontal. The bits move from left to right. The bottom of the image keeps being the bottom
(12) Flip vertical
Flips the selected images vertical. The bits move from bottom to top. The left/right side of the image keeps being the left/right side
(13) Select all
All images will get a set hook in the box below the image (See also (14)) This can be used to delete, rotate or flip selected images.
(14) Select image
The image will get a set hook in the box below the image This can be used to delete, rotate or flip selected images.
Images Edit View

(1) Title
Is derived from the file name when uploading. May have been changed when it was edited in image property view.
(2) Filename
File name of uploaded file on server. May be different from the image name on the PC due to character restrictions in URL or server operating system
(3) Gallery
Tell or changes the parent gallery
(4) Description
Text which is displayed in the gallery view if enabled in the configuration
(5) Status
Publish or hide the image
(6) Ordering
Change appearance order
(7) Owner
Tells user who uploaded the image
(8) Item Preview
Shows a medium sized view of the image
(9) Display parameters
Add parameters used in display of the image to overwrite settings from the configuration for this image.
Use the form of Name='value', one assignment per line. Sadly the name of the item has to be derived from the config control name.
(10) Links to image
Tells the path of the image as URL link
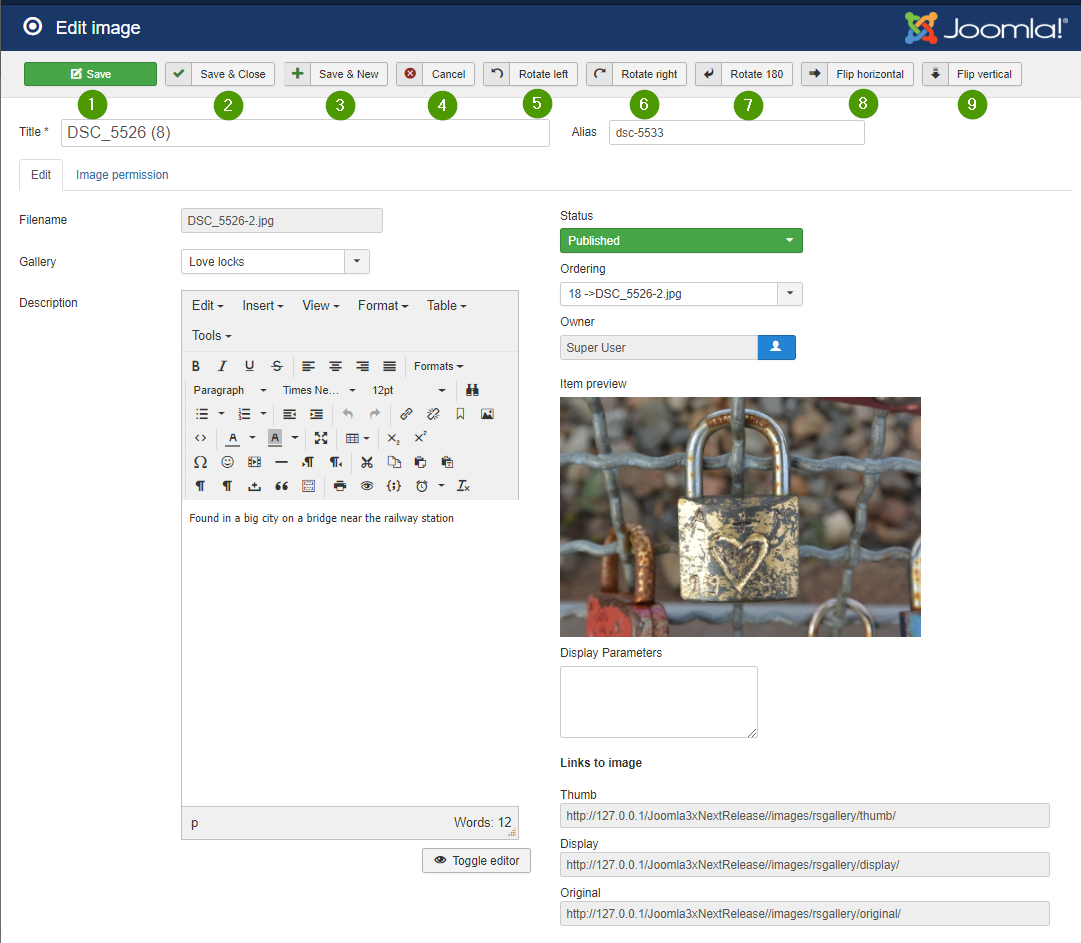
(1) Save
Saves the changes
(2) Save and close
Saves the changes and exits the edit view
(3) Save and new
Saves the changes and opens an empty edit view
(4) Cancel
Exits the edit view
(5) Rotate left
(6) Rotates right
(7) Rotate 180
(8) Flip horizontal
(9) Flip vertical
Not finished, copy of gallery article ...
...
Change Ordering
(1) Click on up and down of the order controls or change the value there.
This will automatically update all other ordering controls but not save to the database
(2) Use the grren "OK" button to write the changes to the database
See following image

The sorting depends on parents and child galleries. Child galleries will be ordered direct behind their parent. This applies also to sub - childs when theparent is a child itself. Then a cascade of childs and sub childs will follow the first parent.
(3) While changing the "first gallery" from 5 down to 2 the child gallery "a subgallery" will always follow having a ordering with 1 higher. Result see below

Sadly this has a side effect. If you try to increase the parent gallery ordering it will not go up through clicking. You may set te value by key which works when leaving the control.
-> In processing, parts present (2017.12.08)
Configuration

Above is the start view when selecting configuration
-
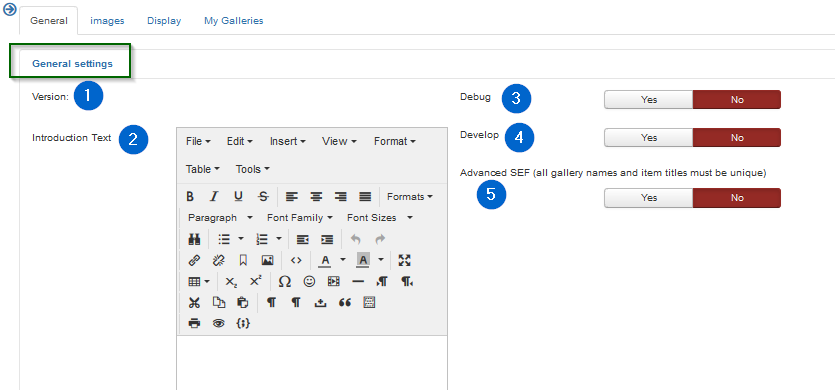
(1) There are four tabs to choose
- General: Debugging and SEF
- Images: Image related settings
- Display: Frontend view relating settings
- My Galleries: Settings for user galleries
-
(2) Sections in Tab
Each Tab contains sections. A click on a section will open or hide the settings within while the other sections stay open or hidden
General
-
(1) Version:
Tells the actual uploaded RSG2 version.
-
(2) Introduction Text
This text is used as a broad header description of the "root gallery" view. The root gallery (with sub galleries and more) will be displayed when the menu type "RSGallery2 -> View of galleries" is activated and the root gallery is chosen for display
-
(3) Debug (Frontend / Backend)
Activates debug functionality. This does write calling parameters and logs some of the used files / classes in a log file.
Attention: On Yes to Debug a log file per day will be created in folder '...//joomla root/administrator/log' and notices may appear on top of a form. Please delete log files regularly". In Maintenance will (may be in near future) be a button to achieve this
Actually (22.07.2018) Using debug on the frontend will create a lot of text in the log files and may get stuck when a lot of users are active. It is best used on the local test web then.
Therefore in the near future the team will introduce different debug variables for backend and frontend
-
(4) Develop
Activates developer functions. Additional 'info' will appear in HTML pages and more functions appear in maintenance view. The additional function may not work or destroy parts of RSGallery2 ....
-
(5) Advanced SEF
All gallery names and item titles must be unique
Images
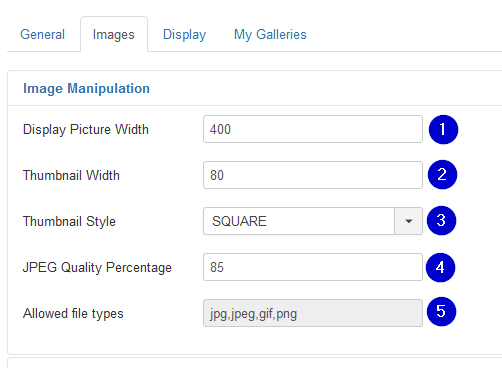
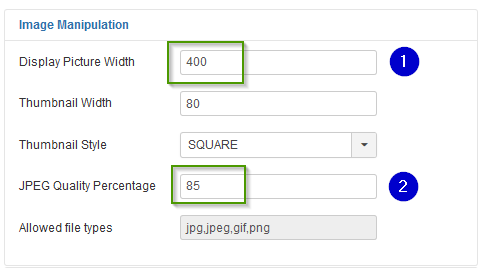
Images: Image Manipulation
-
(1) Display Picture Width
Standard size of displayed image. The downloaded file will be resized to this width for the standard display of the image. The original image is still kept for modal display when clicking on a gallery image
-
(2) Thumbnail Width
Defines the with of the small images (thumbs) in gallery tile view
-
(3) Thumbnail Style
The thumbnail may be sized (styled) for "Square" or "Proportional" dimensions. In "Square" Style the height of the thumbnail is the same as the width. In "Proportional" Style the height is calculated according the width/height proportions of the original image.
-
(4) JPEG Quality Percentage
Defines the quality factor will be used by the resizing from original image to the displayed image
-
(5) Allowed file types
This information tells which file types are supported. The types are defined by the component and therefore can't be changed
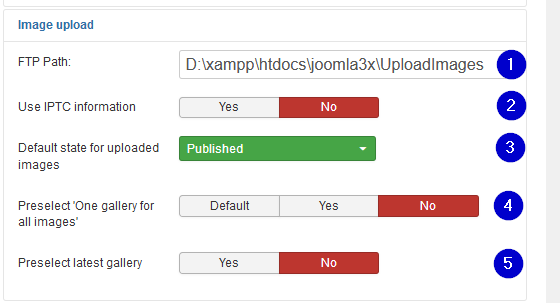
Images: Image upload
-
(1) FTP Path:
Used as initial value in upload (ftp tab) form. Used for uploading images from folder path on remote server. Path must start with base path to the joomla! installation
-
(2) Use IPTC information Yes No
If set to yes: If a file has IPTC information in the fields title (2#005) and description (2#120), then this information will be used upon import of an image in RSGallery2, unless the title and description fields shown in the import steps are used.
If set to no: IPTC information will not be used.
-
(3) Default state for uploaded images
Select between "Published", "Unpublished", "Archived" or "Trashed"
If a user has either Edit State permission or Edit State Own permission and he uploads an item in a gallery he owns (e.g. the user is allowed to change the state from Published to Unpublished and vice versa for images in the selected gallery), then this value indicates whether the uploaded images will be (un)published by default. This setting applies to Frontend as well as Backend, and for single file and batch upload.
For users without Edit State permission the default state is Unpublished.
-
(4) Preselect 'One gallery for all images', Default Yes No
Preselect state for upload form. Yes: Use selected gallery for all images. No: select images in second step
-
(5) Preselect latest gallery Yes No
Preselect the 'Latest gallery' name as default selection in upload form
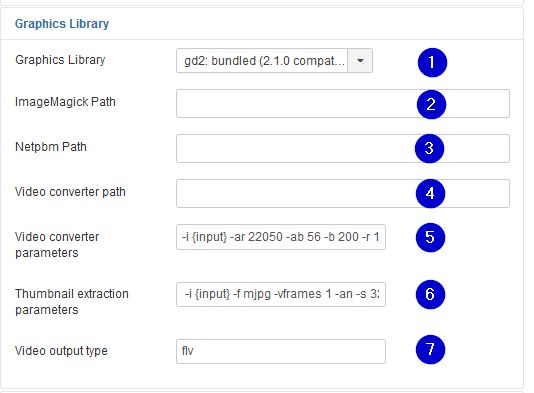
Images: Graphics Library
-
(1) Graphics Library
Old:
Three graphics libraries, GD2, ImageMagick (and Netpbm, are supported if they exist on the server. They are used to make display and thumb-nail images on upload of imagesActually only GD2 is used until further notice
-
(2) ImageMagick Path
Path to the ImageMagick library on the server
-
(3) Netpbm Path
Path to the Netpbm library on the server
-
(4) Video converter path
Videos are actually not supported
-
(5) Video converter parameters
Videos are actually not supported
-
(6) Thumbnail extraction parameters
Video Thumbnail are actually not supported
-
(7) Video output type
Videos are actually not supported
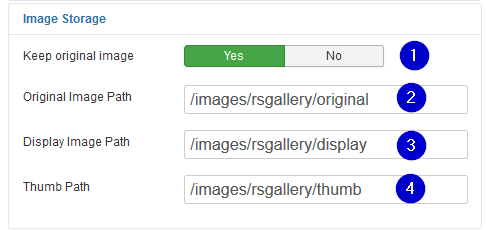
Images: Image Storage
-
(1) Keep original image Yes No
On "yes" the original image will be deleted after the upload process for server space or hiding purposes. On a double click of the display sized image the same image (size) appears then in the popup
Drawback: watermark images not created on upload will use the smaller size "display" image to be build when the user opens the 2original" view"
-
(2) Original Image Path
Select any folder within the Joomla! reachable folder system. You may choose a different folder when you don't show the original images by setting the "Popup style to none" in Configuration -> Tab "display" -> section "Image display". This makes it harder for any user to guess the origin folder to download the original image with big size and good quality .
-
(3) Display Image Path
Select any folder within the Joomla! reachable folder system for the resized displayed images.
-
(4) Thumb Path
Select any folder within the Joomla! reachable folder system for the thumb images.
Future folder structure (2018.07.22)
Actually all images of a certain type are kept in one folder. This limits its use as the amount of files per folder is limited. It may limited to 60000 files on older systems and around 4 GByte files on newer systems. Anyhow the system catches performance issues after too many files in one.
The development team aims for folder per gallery so other slide shows may benefit from this too.
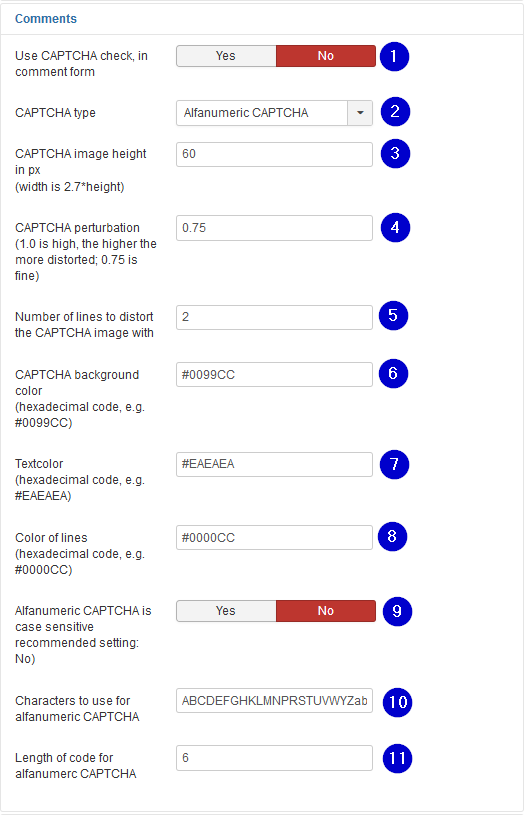
Images: Comments
Comments are activated in configuration under Tab "Display -> section "Image display"
-
(1) Use CAPTCHA check, in comment form Yes No
.
-
(2) CAPTCHA type
.
-
(3) CAPTCHA image height in px (width is 2.7*height)
.
-
(4) CAPTCHA perturbation (1.0 is high, the higher the more distorted; 0.75 is fine)
.
-
(5) Number of lines to distort the CAPTCHA image with
.
-
(6) CAPTCHA background color (hexadecimal code, e.g. #0099CC)
.
-
(7) Textcolor (hexadecimal code, e.g. #EAEAEA)
.
-
(8) Color of lines (hexadecimal code, e.g. #0000CC)
.
-
(9) Alfanumeric CAPTCHA is case sensitive recommended setting: No) Yes No
.
-
(10) Characters to use for alfanumeric CAPTCHA
.
-
(11) Length of code for alfanumerc CAPTCHA
Images: Voting
Voting is activated in configuration under Tab "Display -> section "Image display"

-
(1) User can only vote once (cookie based) Yes No
Defines if a user can vote multiple times ToDo: ? overwrites old voting or adds further voting
-
(2) Cookie prefix
A cookie is used to track the user on voting. Assign a singular prefix only used from your web site
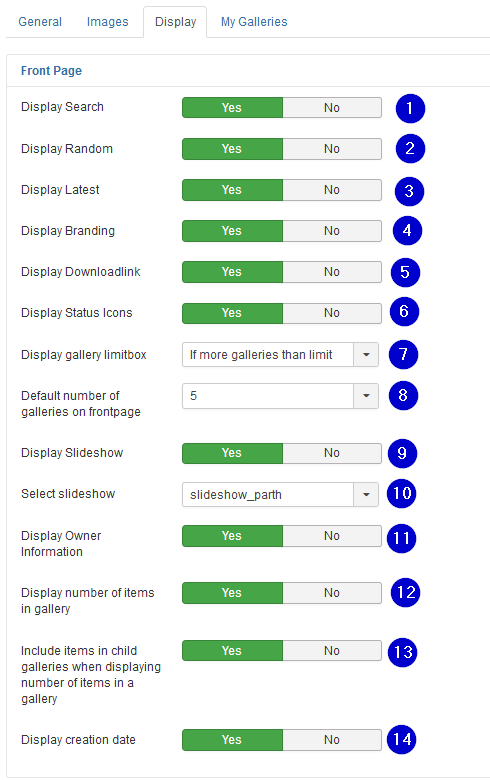
Display
Display: Front Page
-
(1) Display Search Yes No
Displays a search rectangle over the gallery display. The user may search for images where the name or the description matches the search text.
-
(2) Display Random Yes No
On yes an area appears below the standard gallery where Random images are displayed
-
(3) Display Latest Yes No
On yes an area appears below the standard gallery where Random images are displayed
-
(4) Display Branding Yes No
On Yes a text with rsgallery2 information including used version will be shown on the bottom of the single images view
-
(5) Display Downloadlink Yes No
On yes a small thumb with download text appears below the image in the single image view. When the user clicks on it then the original image (big size) is downloaded
-
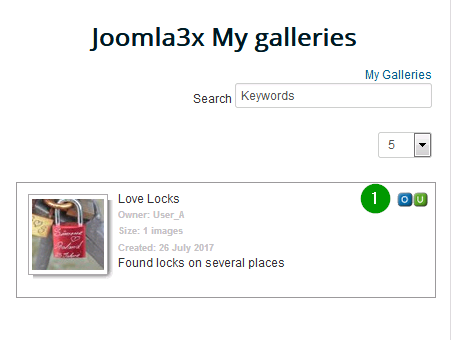
(6) Display Status Icons Yes No
On Yes activates icons with the status of a gallery above the gallery thumb when the user is logged in. This helps if "user galleries" are enabled in "MyGallery" configuration to show the states of the actual gallery.
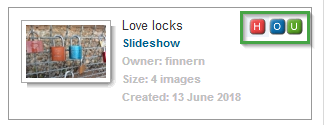
The icons will indicate
- (O) User is the owner of the gallery
- (U) User can upload in this gallery
- (H) The gallery is hidden and not Published
-
(7) Display gallery limitbox
With a displayed gallery limit box the user can choose the maximal number of galleries shown on the viewed page. So he may overwrite the configuration parameter "Default number of galleries on frontpage" and see more or less galleries to choose from.
Possible options
- Always
- If more galleries than limit
- Never
on "If more galleries than limit" this selection box will only appear when there are more galleries to be displayed but limited by parameter "Default number of galleries on frontpage". See below
-
(8) Default number of galleries on frontpage
This limits the galleries displayed to the user. This can be overwritten by the user with a limit box if the box is enabled. See parameter "Display gallery limitbox" above
-
(9) Display Slideshow Yes No
On yes a link is displayed beside the gallery thumb nail which displays on click the selected slide show
-
(10) Select slideshow
Possible options
- slideshow_parth
- slideshow_pathfusion
- slideshowone
Sadly slideshow_pathfusion is not working actually and slideshowone is not that interesting (2018.07.26).
The RSGallery team is working on boostrap and other slide shows in the near future -
(11) Display Owner Information Yes No
On Yes the owner information is displayed on the right side of the gallery thumb
-
(12) Display number of items in gallery Yes No
On Yes the size of the gallery (image count) is is displayed on the right side of the gallery thumb
-
(13) Include items in child galleries when displaying number of items in a gallery Yes No
Defines the type of images count of the view of previous configuration parameter
-
(14) Display creation date Yes No
On Yes the owner information is displayed on the right side of the gallery thumb
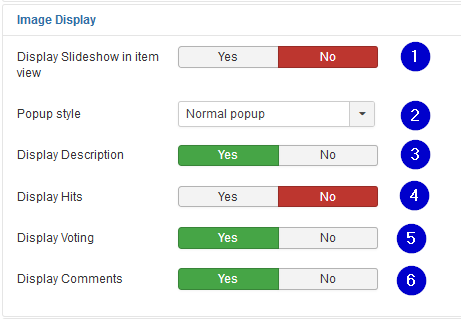
Display: Image Display
-
(1) Display Slideshow in item view Yes No
Adds a "slideshow" link to the single image view. It leads to a page displaying the selected type of slideshow
-
(2) Popup style Defines the method ("No popup", "Normal popup", "Joomla Modal") used for displaying a popup (big image) after a click of the image in single image display.
"No popup": A click on the image does not open a popup
"Normal popup": After click on the image the original image is displayed in a separate browser window style
"Joomla Modal": After click on the image a popup in a modal style with to close appear in front of the small image screen -
(3) Display Description Yes No
On "Yes" a rectangle below the single image display is added. It contains a header with title "Display" and below a field where the description of the image is displayed.
-
(4) Display Hits Yes No
On "Yes" a rectangle below the single image display is added. It contains a header with title "Hits" and below a field where the number of "hits" of the images is displayed.
-
(5) Display Voting Yes No
On "Yes" a rectangle below the single image display is added. It contains a header with title "Comments" and below a field where comments can be inserted.
-
(6) Display Comments Yes No
On Yes a rectangle below the single image display is added. It contains a header with title "Comments" and below a field where comments can be inserted.
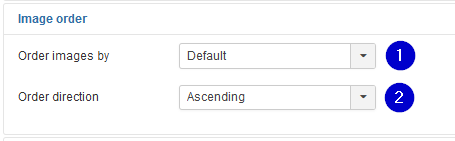
Display: Image order
-
(1) Order images by
The displayed imaged may be ordered by the types "Default", "Date", "Name", "Rating" or "Hits
-
(2) Order direction
The appearance of order type (see above) can be displayed in ascending or descending order
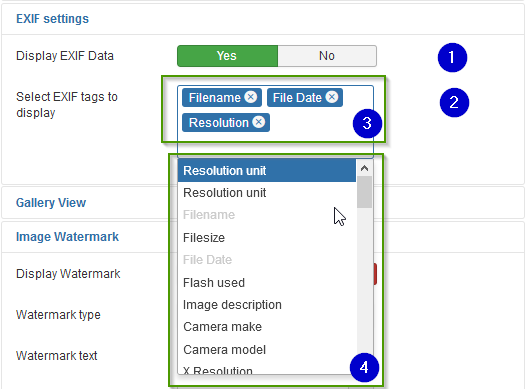
Display: EXIF settings
-
(1) Display EXIF Data Yes No
If the image contains EXIF data these may be displayed as info in a rectangle below the image in the single image view It appears beside Description, Voting and Comments in a separate table part
-
(2) Select EXIF tags to display
Select the information which shall be shown to the user. Multiple selections are supported
-
(3) Selected items box
A items listed here are selected for display
-
(4) Possible properties list
Shows a list of selectable EXIF properties. Inverted items are selected
Display: Gallery View
Gallery view appears when the user selected a gallery with a click on the gallery thumbs It displays image thumbs with information about the imaged

-
(1) Thumbnail Style:
"Table", "Float" or "Magic" Use float for variable width templates sorry "Magic" -> not supported (yet) "Table": The thumb nails are embedded in table elements
"Float": The thumb nails are embedded in an unordered list -
(2) Direction (only works for float) Assigns the direction "Left to right" or "Right to left" of the unordered list elements
-
(3) Number of Thumbnail Columns (only for table)
Number of thumbnails in a row
-
(4) Thumbnails per Page
Set the maximum thump nails displayed on one page. There will be a page navigation displayed if the gallery contains more images.
-
(5) Show image name below thumbnail Yes No
On yes the image name will shown below the thumbnail
-
(6) Navigation bar display
Adds a navigation bar in the single image display of the gallery Possible selections: Top, bottom, both, none
-
(7) Display Slideshow in gallery view Yes No
Adds a "slideshow" link to the gallery view. It leads to a page displaying the selected type of slideshow
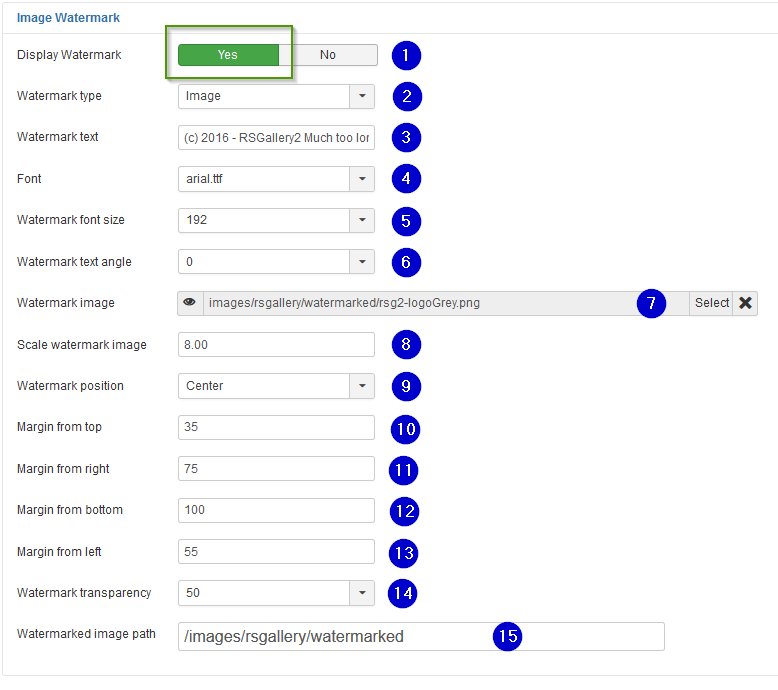
Display: Image Watermark
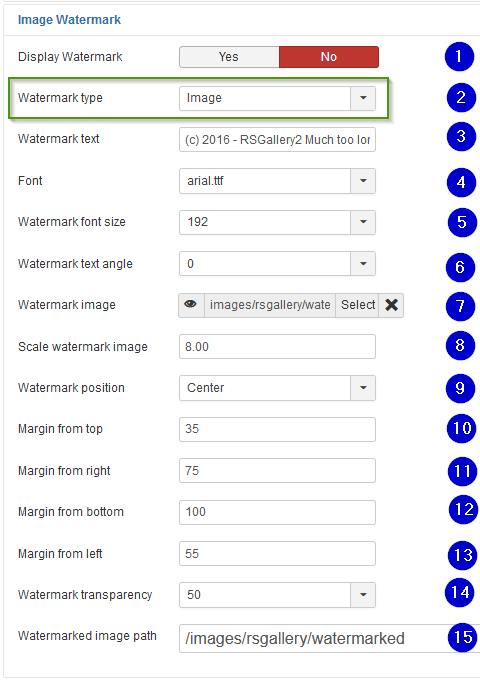
If you consider using watermarked files see also description "How to hide the original image from the user"
-
(1) Display watermark
Activate if watermarked files should be used on "big size" image view. It will replace the original file which would be displayed otherwise.
A watermarked replacement file will be created once when uploading or when viewed the first time. The watermarking will be a text defined in the configuration.
Optional: Add icon or other image as watermark. (This has to be developed. It can be done in short time. Send us an email if you need it and we will care for it) -
(2) Watermark Type
The watermark may be merged from "text" or from an "image" into the display image
-
(3) Font
Select the font type of the watermark text
-
(4) Watermark text
Define the text to be displayed in the image
-
(5) Watermark font size
Select the font size of the watermark text
-
(6) Watermark text angle
Define the angle of the watermark text
-
(7) Watermark image
Will be merged into the big display image. Watermark image should be smaller then display image
-
(8) Scale watermark image
Enter a factor to enlarge the watermark image. 1.0 will use the original. Smaller values will reduce the watermark image size
-
(9) Watermark position
Select the position of the watermark text
-
(10) Margin from top
-> Not used
-
(11) Margin from right
-> Not used
-
(12) Margin from bottom
-> Not used
-
(13) Margin from left
-> Not used
-
(14) Watermark transparency
Define transparency of the text to be displayed in the image. A higher value makes the watermark more transparent. Transparency of 100% makes the watermark invisible
-
(15) Watermark image path
Define the destination path of the created watermarked files
My Galleries
My galleries supports the creation of user galleries
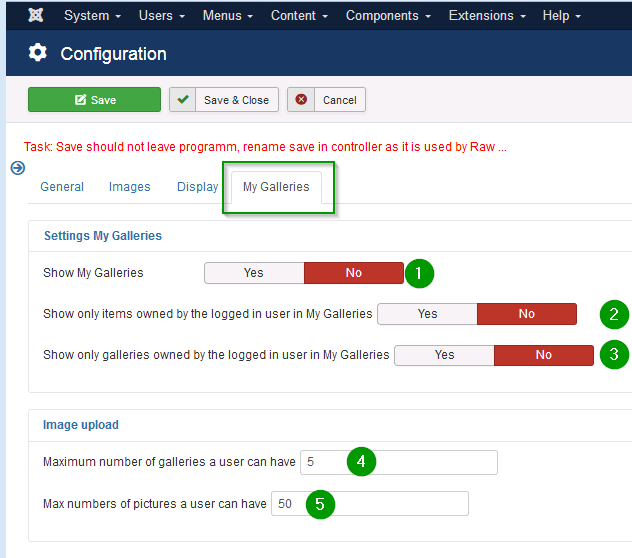
Settings My Galleries
-
(1) Show My Galleries
On yes it activates this functions
-
(2) Show only items owned by the logged in user in My Galleries
Restricts the shown images on front end to users who own the image and who are logged in.
??? The images of the user may be in several galleries owned by other people. ???
-
(3) Show only galleries owned by the logged in user in My Galleries Yes No
Restricts the shown galleries on front end to user who own the gallery and who are logged in.
Image upload
-
(4) Maximum number of galleries a user can have
Restrict the amount of galleries a user may create
-
(5) Max numbers of pictures a user can have
Restrict the amount of images a user may upload. It counts number of images over all galleries
Watermarked files
[ ] ToDo: initial description, recheck content
- Watermark
A watermarked replacement file will be created once when uploading or when viewed the first time. The watermarking will be a text defined in the configuration. Optional: Add icon or other image as watermark. (This has to be developed. It can be done in short time. Send us an email if you need it and we will care for it)
- Disguise watermarked file names
Additional the created watermarked files are disguised with a different filename. So users can't immediately guess the URL of the next or previous image. So it is harder to download all your images and remove the watermark with an imaging application
Drawbacks
- The small sized "display" files have no watermark
- The "display" files can be found with guessing and a knowledge of the RSGallery2 / Joomla structure
- If you switch on watermarking after uploading the images then the watermarking tries to use the original image. If it doesn't exist then it uses the "display" files with lower resolution.
Setup watermarked configuration:
- Hide (delete) original after upload

In configuration->images->section "Image storage"
- (1) activate the "no" selection
- Check "display" resolution
In configuration->images->section "Image manipulation"
- (1) Display picture width defines the maximum size of the displayed image.
- (2) You can reduce the quality of the displayed image to your needs
- Check watermark settings
In configuration->display->section "Image watermark"
- (1) Display watermark Activate if watermarked files should be used on "big size" image view. It will replace the original file which would be displayed otherwise. A watermarked replacement file will be created once when uploading or when viewed the first time. The watermarking will be a text defined in the configuration. Optional: Add icon or other image as watermark. (This has to be developed. It can be done in short time. Send us an email if you need it and we will care for it)
- (2) Watermark type A text or an image can be merged into the original image as a watermark
- (3) Watermark text Define the text to be displayed in the image
- (4) Font Select the font type of the watermark text
- (5) Watermark font size Select the font size of the watermark text
- (6) Watermark text angle Define the angle of the watermark text
- (7) Watermark image Will be merged into the big display image. Watermark image should be smaller then display image"
- (8) Scale watermark image Enter a factor to enlarge the watermark image. 1.0 will use the original. Smaller values will reduce the watermark image size
- (9) Watermark position Select the position of the watermark text.
- (10) Margin from top
- (11) Margin from right
- (12) Margin from bottom
- (13) Margin from left Margin from the border of the original image. Watermark is placed with distance to the border, if it is not centrally located
- (14) Watermark transparency Define transparency of the text to be displayed in the image
- (15) Watermark image path Define the destination path of the created watermarked files
How to hide the original image from the user
Intention:
You want to show your images to the customers but the customer shouldn't be able to download in original resolution. The RSGallery2 supports this with some small drawbacks.
We can't avoid that every image that is shown in the browser the user can download which is not what you want.
Solutions:
- Prevent showing the original image on double click on the image
- Automatic remove the original size image file after upload
- Display a watermarked file instead of the original image
Display types in RSGallery2
- "Thumbs": Shown in gallery overview ==> No need for watermarking
- "Display": Single image view in slideshow and similar views ==> Expected to be resized into lesser quality and therefore no watermark.
- "Original": A double click on a "display" image leads to a full screen "lightbox" image of the original file.
Solution "Popup style to none":
Configuration -> Tab "display" -> section "Image display"
-
(2) Popup style Defines the method ("No popup", "Normal popup", "Joomla Modal") used for displaying a popup (big image) after a click of the image in single image display.
Possible selections:
- "No popup": A click on the image does not open a popup or display the "original" image in a separate window
- "Normal popup": After click on the image the original image is displayed in a separate browser window style
- "Joomla Modal": After click on the image a popup in a modal style with to close appear in front of the small image screen
Choose "No popup" to avoid the download of the original size image. Then the user will only see the small sized "display" image.
Drawback
- The "original" files can be found and opened in the browser with guessing if a knowledge of the RSGallery2 / Joomla structure exists.
This can be disguised using a different folder for originals (see configuration image below)
Solution "Automatic remove the original size image file":
Configuration -> Tab "Image" -> section "Image Storage"
-
(1) Keep original image Yes / No
On "yes" the original image will be deleted after the upload process for server space or hiding purposes. On a double click of the display sized image the same image (size) appears then in the popup
Drawback:
Watermark images not created on upload will use the smaller size "display" image to be build when the user opens the 2original" view"
Solution "Watermarked files":
-
Resized display image (to bad quality) On upload the original image it is resized to display size defined in configuration. This reduces "interest" of your user to download with this bad quality
-
Watermark A watermarked replacement file will be created once when uploading or when viewed the first time. The watermarking will be a text defined in the configuration.
Optional: Add icon or other image as watermark. (This has to be developed. It can be done in short time. Send us an email if you need it and we will care for it) -
Disguise watermarked file names Additional the created watermarked files are disguised with a different filename. So users can't immediately guess the URL of the next or previous image. So it is harder to download all your images and remove the watermark with an imaging application
Drawbacks
- The small sized "display" files have no watermark
- The "display" files can be found with guessing and a knowledge of the RSGallery2 / Joomla structure
- If you switch on watermarking after uploading the images then the watermarking tries to use the original image. If it doesn't exist then it uses the "display" files with lower resolution.
Setup watermarked configuration:
- Hide (delete) original after upload
In configuration->images->section "Image storage"
- (1) activate the "no" selection
- Check "display" resolution
In configuration->images->section "Image manipulation"
- (1) Display picture width defines the maximum size of the displayed image.
- (2) You can reduce the quality of the displayed image to your needs
- Check watermark settings
In configuration->display->section "Image watermark"
- (1) Display watermark
Activate if watermarked files should be used on "big size" image view. It will replace the original file which would be displayed otherwise.
A watermarked replacement file will be created once when uploading or when viewed the first time. The watermarking will be a text defined in the configuration.
Optional: Add icon or other image as watermark. (This has to be developed. It can be done in short time. Send us an email if you need it and we will care for it) - (2) Watermark type
A text or an image can be merged into the original image as a watermark - (3) Watermark text
Define the text to be displayed in the image - (4) Font
Select the font type of the watermark text - (5) Watermark font size
Select the font size of the watermark text - (6) Watermark text angle
Define the angle of the watermark text - (7) Watermark image
Will be merged into the big display image. Watermark image should be smaller then display image" - (8) Scale watermark image
Enter a factor to enlarge the watermark image. 1.0 will use the original. Smaller values will reduce the watermark image size - (9) Watermark position
Select the position of the watermark text. - (10) Margin from top
- (11) Margin from right
- (12) Margin from bottom
- (13) Margin from left
Margin from the border of the original image. Watermark is placed with distance to the border, if it is not centrally located - (14) Watermark transparency
Define transparency of the text to be displayed in the image - (15) Watermark image path
Define the destination path of the created watermarked files
MyGalleries.Introduction.md
My Galleries
A site administrator can enable My Galleries for users to upload and view their own galleries (setting Show My Galleries, 'no' by default). A extra element will appear on the gallery view when a user has logged in on the front end.
View of user created "My Gallery" gallery
The "My Galleries" are shown on the module where the menu with type RSGallery2 is displayed. Above the RSGallery2 "Search box" the user can click on "My galleries" link (3)
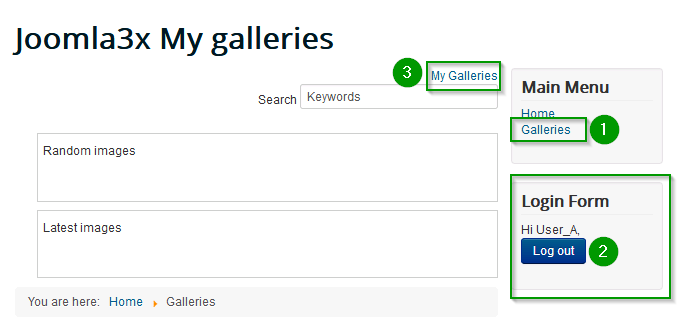
(Link must be activated in configuration of RSG2)
Clicking on that link will show a page like
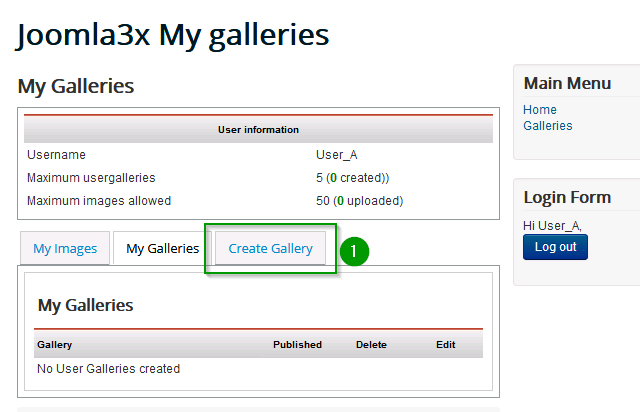
If tab (1) does not appear the user has not enough rights
My Gallery: Set it up, get it started
- Enable "My Galleries" in RSG2 configuration
- Create a user group with rights to handle their own galleries and Images
- Assign user rights for this group on
- Assign the standard RSGallery2 view to a menu
Configuration of My Galleries
More description in section configuration
Create a user group for "My Galleries" users
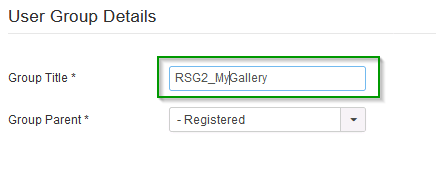
A separate user groups helps to assign special rights for "My Gallery" users.
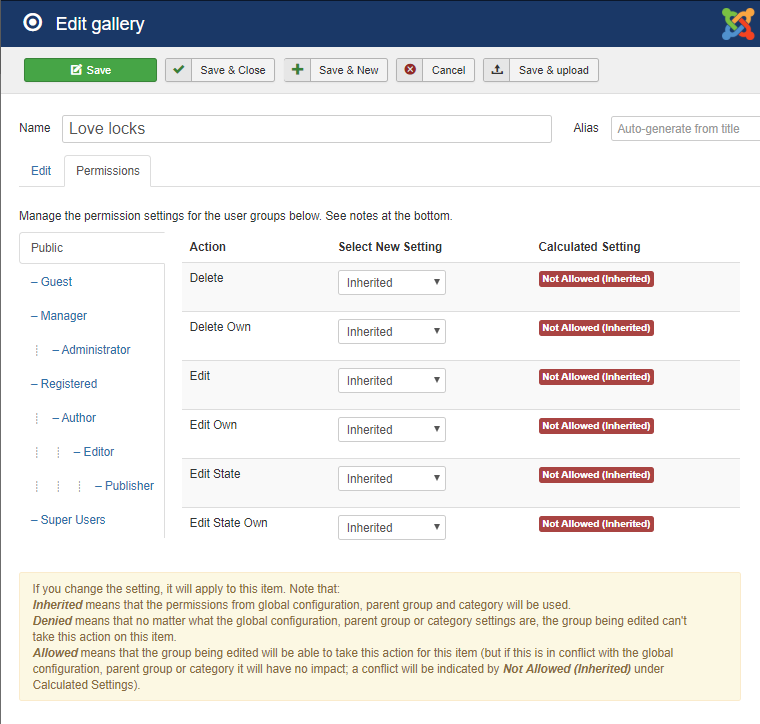
Assign user rights for this "My Galleries" users group
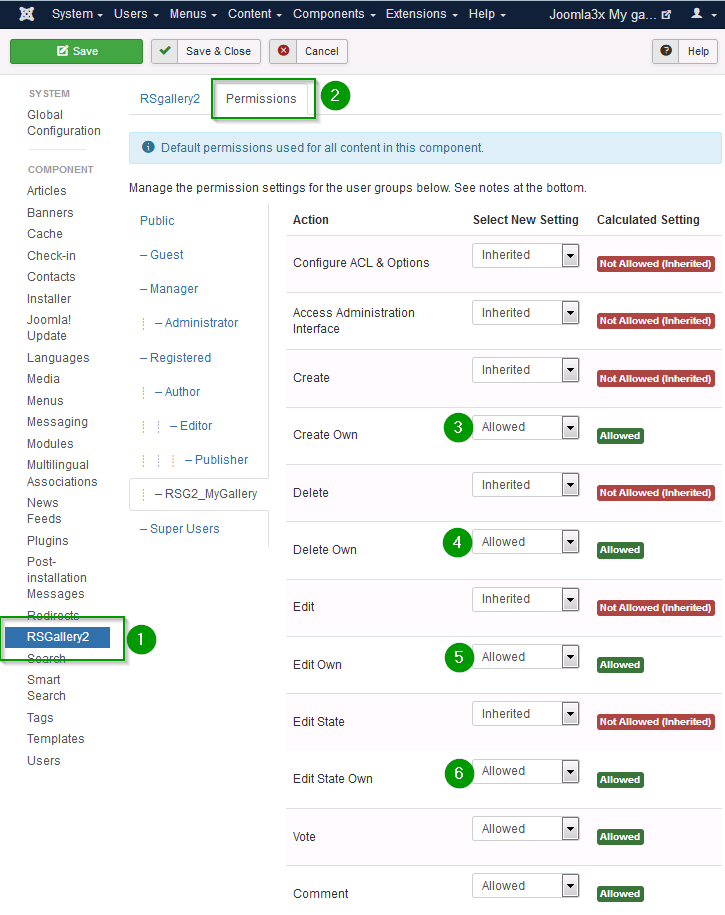
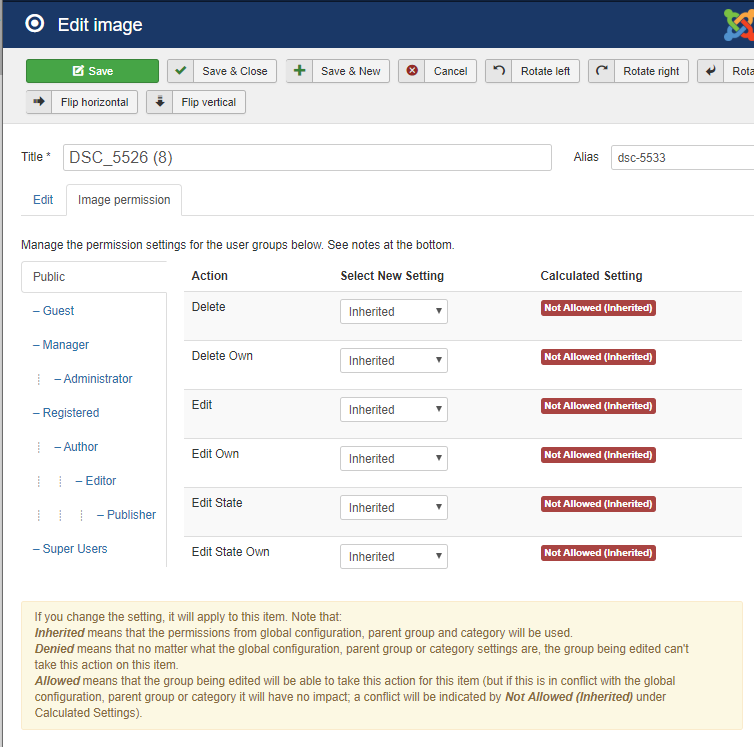
(1) Search for RSGallery2 in System->Global configuration
(2) Select Permissions
(3)-(6) Activate the "Create own", "Delete own", "Edit own", "Edit state own" permissions. The "vote" or "comment" permissions enable actions on the images itself. They are not needed for the handling of galleries and images.
Edit Permission, Edit State Permission (to publish or unpublish an item or gallery), Delete Permission and Create Permission for items and galleries.
A user with none of these permissions can only see the items and galleries, but cannot publish, delete, edit or create items or galleries. That is reflected on the tabs My Images and My Galleries by the grey icons for the items and galleries. That user will also not see the Add Image and Create Gallery tabs.
However, when a user has all permissions, the icons are no longer greyed out, and there are two more tabs: Add Image and Create Gallery. A site administrator can choose to give only specific permissions to a user group, e.g. only Edit permission, and only give that permission for a specific gallery. Then the user will see from the icons being grey (and non-functional) or not if they have that permission.
Assign the standard RSGallery2 view to a menu
This may be done already as it is as simple as assigning the standard view to a menu
My Gallery: Set it up, get it started
- Enable "My Galleries" in RSG2 configuration
- Create a user group with rights to handle their own galleries and Images
- Assign user rights for this group on
- Assign the standard RSGallery2 view to a menu
Configuration of My Galleries
More description in section configuration
Create a user group for "My Galleries" users
A separate user groups helps to assign special rights for "My Gallery" users.
Assign user rights for this "My Galleries" users group
(1) Search for RSGallery2 in System->Global configuration
(2) Select Permissions
(3)-(6) Activate the "Create own", "Delete own", "Edit own", "Edit state own" permissions. The "vote" or "comment" permissions enable actions on the images itself. They are not needed for the handling of galleries and images.
Edit Permission, Edit State Permission (to publish or unpublish an item or gallery), Delete Permission and Create Permission for items and galleries.
A user with none of these permissions can only see the items and galleries, but cannot publish, delete, edit or create items or galleries. That is reflected on the tabs My Images and My Galleries by the grey icons for the items and galleries. That user will also not see the Add Image and Create Gallery tabs.
However, when a user has all permissions, the icons are no longer greyed out, and there are two more tabs: Add Image and Create Gallery. A site administrator can choose to give only specific permissions to a user group, e.g. only Edit permission, and only give that permission for a specific gallery. Then the user will see from the icons being grey (and non-functional) or not if they have that permission.
Assign the standard RSGallery2 view to a menu
This may be done already as it is as simple as assigning the standard view to a menu
Maintenance functions
The maintenance form supports with sub forms several functions to check and repair the rsgallery2 image and database universe.
Each grey array is a button to click on. In most cases a sub form will open where more info or actions are provided
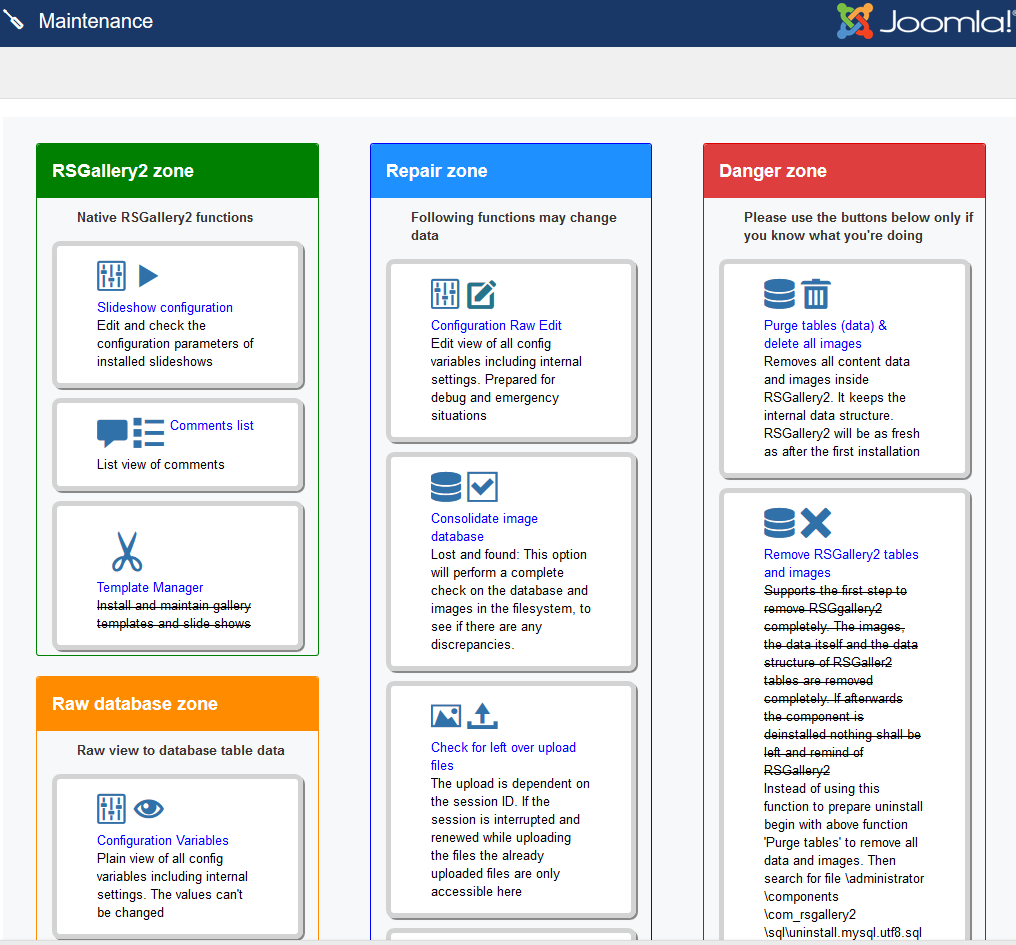
Zones
-
Rsgallery2 zone
Handles slideshows and templates
-
Repair zone
The image file system can be checked to match the database. Also the configuration can be checked here.
-
Danger zone
Delete database entries and database structure
-
Raw database zone
A window to the pure content of the database (lists)
-
Outdated zone
Door to old view of functions like image/galleries lists
-
Upgrade (from 1.x / 2.x) zone
Helpers after upgrading RSG2 from previous J!x versions
Rsgallery2 zone

(1) Slideshow configuration
Edit and check the configuration parameters of installed slideshows. Leads to a separate view for the edit of slideshow parameter.
See separate maintenance document ""
(2) Comments list
Enters list view of comments
(3) Template manager
Actually not working. (2014-2018)
In older version it had the function to upload slideshows and templates for the display of the gallery in frontend. These could be edited or deleted also.
Repair zone
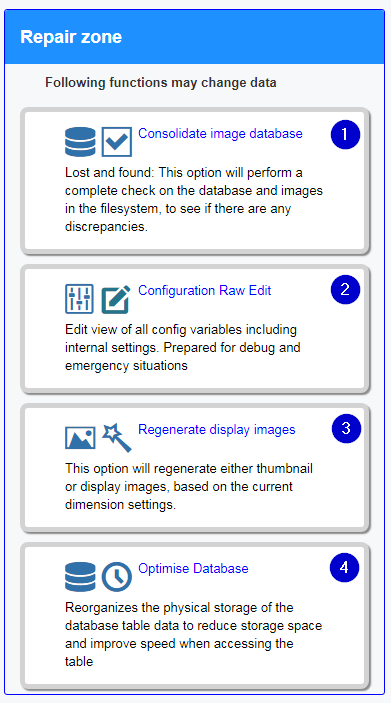
(1) Consolidate image database
The consistence of the database to image files can be checked here. The following view supports the check and repair of image orphans in database or as missing image files.
(See separate maintenance document "")
(2) Configuration Raw edit
Edit view of all config variables including internal settings. Prepared for debug and emergency situations. Lists all variables in alphabetical order. The values can be changed and saved.
(4) Regenerate display images
This option will regenerate either thumbnail or display images, based on the current configuration settings of thumbnail dimensions
(5) Optimize database
Reorganizes the physical storage of the database table data to reduce storage space and improve speed when accessing the table
Danger zone
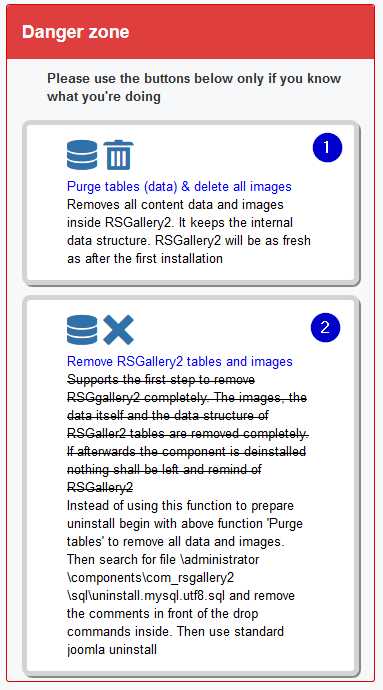
(1) Purge tables (data) & delete all images
Supports the first step to remove RSGgallery2 completely.
Therefore the content (items) in all RSGaller2 tables are removed. Additionally the image files are deleted. The data structure is kept but is empty.
This can also be used to purge the data and start again empty with new images and new galleries.
If afterwards the component is de installed nothing shall be left and remind of RSGallery2
(2) Remove RSGallery2 tables and images The previous intention was to support the uninstall that by removing databases tables and image files. The side effect of this function was that Joomla! did start with error and RSGallery2 could not be uninstalled
Instead of using this function begin with above function 'Purge tables (data)' See following instruction for a complete remove
How to remove RSGALLERY2 completely
(1) Use Maintenance -> Purge tables
This removes the database content and the image files
(2) Prepare the remove of database table structure
Search in admin rsgallery2 folder \administrator\components\com_rsgallery2\sql\ for file uninstall.mysql.utf8.sql. Edit the file and remove the comments in front of the drop commands.
(3) Standard uninstall
Use finally standard Joomla uninstall to get rid of all parts of RSGallery2
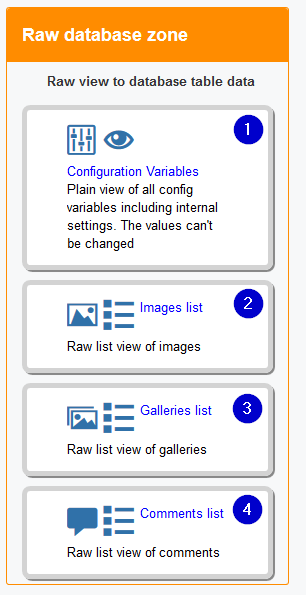
Raw database zone
The buttons lead to the pure content view of the database lists
(1) Configuration variables
Shows a list with actual values of all configuration variables
(2) Images list
Shows a list with the database properties of all images. This contains more columns as the normal image view.
(3) Galleries list
Shows a list with the database properties of all galleries. This contains more columns as the normal image view.
(4) Comments list
Shows a list with the database properties of all comments. This contains more columns as the normal image view.
Outdated zone
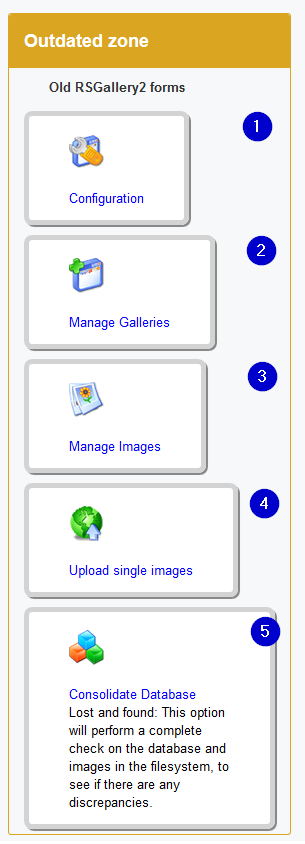
Door to old view of functions like image/galleries lists These buttons lead to the previous views of RSG2 around 2013 or beginning of J3x
the functionality is not granted as this old code is not maintained any more. Still it may be a hint what has improved over this time
(1) Configuration
%
(2) Mange galleries
%
(3) Manage images
%
(4) Upload single images
%
(5) Consolidate database
Don't use. It is only listed for completeness
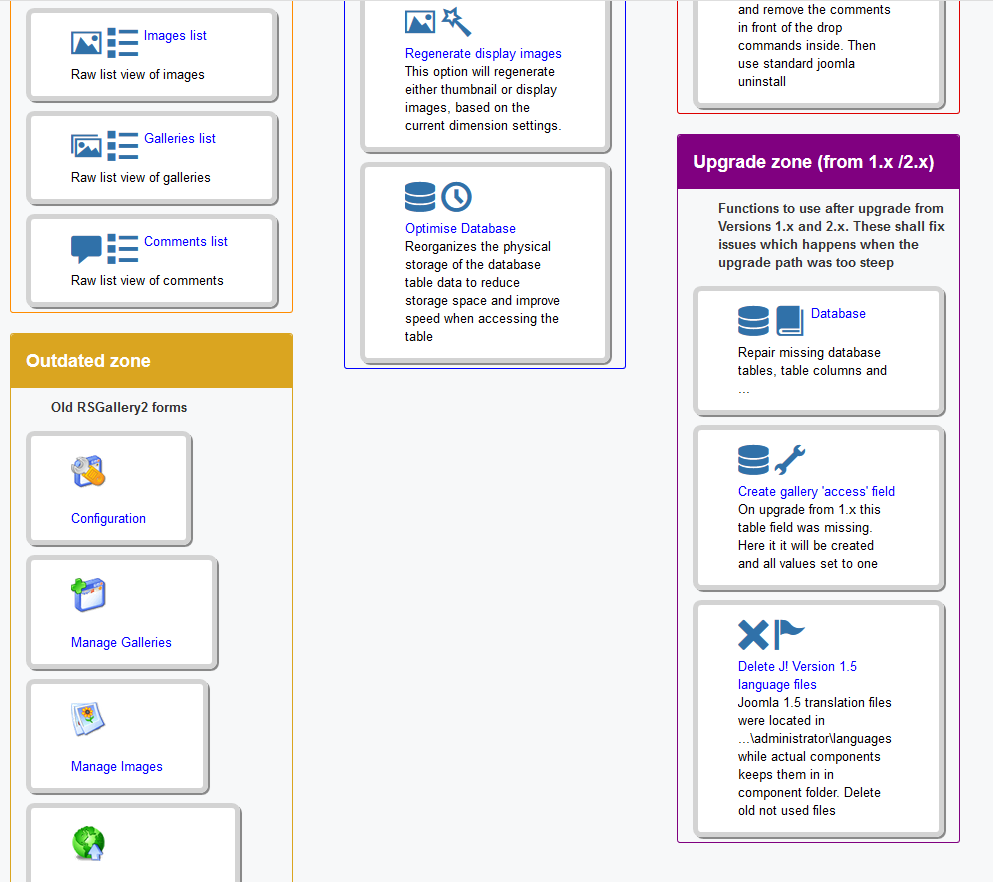
Upgrade (from 1.x / 2.x) zone
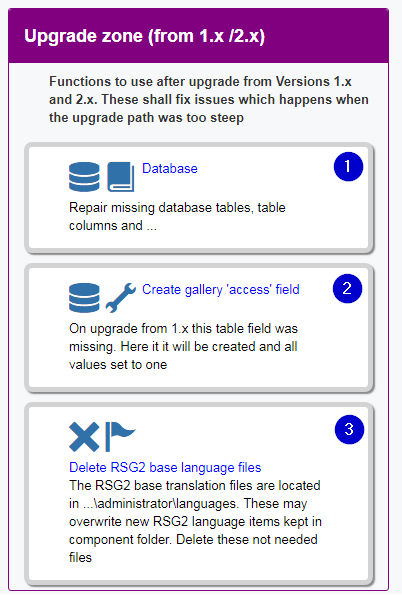
(1) Database
Repair missing database tables, table columns and ... This function reassigns the actual SQL definitions. Therefore new tables, new columns are added and not supported columns are removed
This is useful when upgrading from a real old version and general list can not be viewed
(2) Create gallery "access" field
On upgrade from 1.x this table field was missing. Here it will be created and all values set to one
(3) Delete RSG2 base language files
Deletes RSGallery2 languages files in joomla base language folders. The RSG2 base translation files are located in ...\administrator\languages. These may overwrite new RSG2 language items kept in component language folder.
Use this function when an update installation does not overwrite "old" base language files and translations do not appear or appear as old.
Maintenance Slideshow configuration
Slideshow parameters can be changed here
Two files living within the slideshow code define the parameters and their values
-
templateDetails.xml
Existing parameter and their default value are defined in section param.
-
params.ini
The actual values are taken from this file. If a value is not defined here than the default value will be used.
The format is parameter="value". The double quotes may be omitted
The slideshow code files reside in path on the server: ".../joomla/components/com_rsgallery2/templates/"
Path to edit configuration form
Goto maintenance -> Use button (1) Slideshow configuration

Slideshow edit configuration form

(1) Select the slideshow to edit
(2) Section slideshow parameter
The variables shown here are definitions for the slideshow prepared in Joomla edit format. These and their default value are defined in file templateDetails.xml in section "param".
On "Save parameter" all values are written into the params.ini file and will appear in below section
(3) Section slideshow file
The values in params.ini file set the actual used values and overwrite the default. Here the actual values are displayed in "INI" format. The format is parameter="value". The double quotes may be omitted. The values displayed are used when the slideshow is shown. If the file (text area) is empty then the standard values are used. The file is filled when the configuration parameters are saved. Lines with standard values are not needed and can be removed.
Save changes

The parameters may be saved by the buttons in the menu bar (1) or below the parameter area. (3)
The file area may be saved by the buttons in the menu bar (2) or below the parameter area. (4)
Tip:
Reset to default values
Delete the content of the file params.ini in the below section and save it (button in below section). Afterwards save the parameters (button in above section). All default settings will appear in file parameter definition area.
Maintenance Consolidate image database
In cases where the upload got stuck you may get an error message but can't tell how far the process got. Here you can check the consistency of image references in database and files found in the images folder of RSGallery2
This function checks the links of images between image files and database assignments. It finds left over items like orphaned files or database image reference with missing file
How to get there
In "control panel" select Maintenance

There select in section "Repair zone" the button "Consolidate image database".

This will lead to a page where it is checked whether there are database entries for missing images or for images with no database / gallery connection
Result of checks
On opening the form or clicking on "Repeat checking" the system is checked and the result is displayed.

In (1) appears the list of files with "missing parts".
(2) Area with filename and check box to select images for further actions -> (7)
(3) Area with state of image. On green the item exists an red it is missing
(4) Direct action buttons. On click the task is performed on the file of the rows
(5) The parent gallery of the file in the row is listed and one of the matching images is displayed
Area with state of image.

On green the item exists an red it is missing (1) Each column indicates a file missing or existing
For file origin folder see configuration settings
- Original folder: High resolution file. May be not saved on upload if prohibited in configuration
- Display folder: File with defined resolution on upload. It will be used in slide shows
- Thumb folder: Thumb size resolution files used in gallery view.
- Watermark folder: This column/files will only appear if this feature is activated in the configuration. The filename in the folder may not match the used filename in database or the other image folders
Direct action buttons

On click the task is performed on the file of the rows Similar to the button in the header area these button issue immediate task on the image references(items) of this row
(1) Create missing images in row
(2) Assign gallery name
(3) Repair all issues in row
(4) Remove items in rows
More detailed description can be found below when the list buttons are explained
Action buttons for selected images

The above buttons can be used for selected file lines
(1) Create database entries
- Adds database references to the selected files
(2) Create missing images
- Used the original or display image to create the missing ones. If only the thumbnail is given it is used also but the result may not be very bright.
(3) Create missing watermarks
- If watermark is selected in the configuration watermarked files are created for the selected files
(4) Assign gallery
- Above the file list on the right side a gallery can be selected. On clicking this button the selected files will be bound to the gallery
(5) Remove items in rows
- Does delete all existing connected items of the selected files. Deletes the references in the database and the existing files. Here all obsolete data may be cleaned.
(6) Repair all issues
- This button fixes all missing references. It creates database references and missing image files.
Assignment of image(s) to parent gallery

On the right side above the image list the user can define the parent gallery to be used in image action. The gallery can be assigned with a button "Assign gallery" within the image row or for all selected images with the similar button on top of the page.
If Button "Repair all" is clicked and a gallery is selected this gallery is assigned.
"Lost" database file references
If no files exists to a "lost" database item the result looks like following. 
In this case it is best to select the line and use button "Remove items in row" to delete this item in database.
Back door assignment of images to existing galleries
A indirect way to upload images to RSGallery2 is to copy of the image(s) to the RSGallery2 original folder. Go to "consolidate images" view.
1. Upload image
Copy your file per FTP into folder .../Joomla/images/rsgallery/original.
2. Create files and database reference

(1) Use button "Repeat checking" so the image is found
(2) If the image exists it is marked here
(3) If the image exists it is displayed here
(4) Select the parent gallery
(5) Select the line(s) with clicking on marker in front
(6) Use button "Repair all issues"
If all goes well then the line of the selected image(s) will disappear in the next display of the page
RSGallery2_Module_LatestGalleries
The RSGallery2 Module LatestGalleries shows as the name suggests the latest galleries from RSGallery2
- A click on the thumb nail may lead to
- .
- .
- .
General
- .
- .
- .
- .
Parameter in back end
Tab Modul

-
(1) Number of rows
Number of vertical images (Images per column)
-
(2) Number of columns
Number of horizontal images (Images per row) The number of displayed images is the result from Count = row number times column number. Therefore Count image names are fetched from the Database and prepared for the display
-
(3) Select galleries to show images from
e.g. 3,8,42. The used galleries may be restricted to a selection. Please use a comma separated list. Select galleries to show images from where multiple galleries are separated by a comma, e.g. '3,8,42' or '5'. If you want to show images from all galleries enter '0'. The access level of user will be taken into account, so if a user is not allowed to see gallery 2 its images won't show even if you put it here.The gallery id numbers to use can be found here: Backend > Components > RSGallery2 > Galleries, in the column ID
-
(4) Include sub galleries: (No/Yes)
When the range of galleries is limited by user input (see above) the child galleries may be included in the image search
-
(5) Display type of image to show
RSGallery2 stores the original (depending on settings), a display sized image and a thumbnail sized image. User can select which display type is to be used.
-
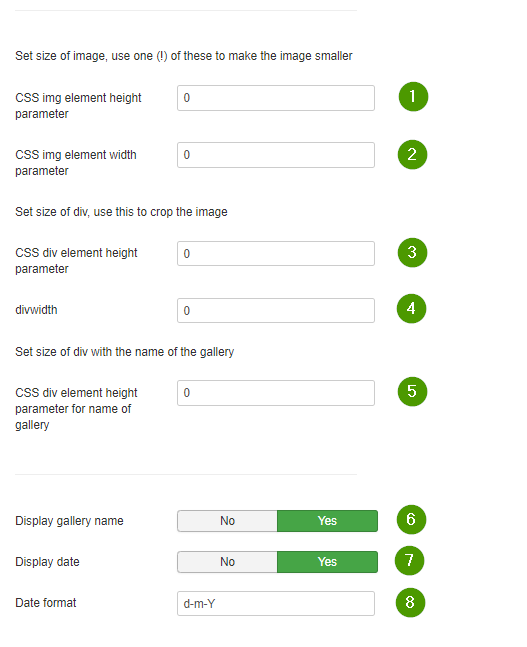
(1) CSS img element height parameter:
Enter the size of the CSS height attribute of the image to show in pixels. If '0' is entered there won't be a height specified for img element and the actual height of the image will be taken.
-
(2) CSS img element width parameter:
Enter the size of the CSS width attribute of the image to show in pixels. If '0' is entered there won't be a width specified for img element and the actual width of the image will be taken CSS width attribute for the img and the div element (0=no attribute) Set size of image, use one (!) of height or width to make the image smaller. Set one or both settings for image height and width to 0, this will keep the aspect ratio of the image, if you set a size for both the image will be stretched. Do not set the size larger than the actual image size, e.g. when a thumb size image has a size of 50x50 pixels, don't set either size to larger than 50, rather use the larger display or the original image
-
(3) CSS div element height parameter:
Set size of div, use this to crop the image. Enter the size of the CSS height attribute of the div that holds the image in pixels. This will crop the image. If '0' is entered there won't be a height specified for the div element and it will fit the actual height of the image
-
(4) CSS div element width parameter:
Set size of div, use this to crop the image. Enter the size of the CSS width attribute of the div that holds the image in pixels. This will crop the image. If '0' is entered there won't be a width specified for the div element and it will fit the actual width of the image
-
(5) CSS div element height parameter for name of gallery:
CSS div element height parameter for name of gallery. Enter the size of the CSS height attribute of the dive that holds the name of the image, in pixels. If '0' is entered there won't be a height specified for the div element.
There is no width parameter to set the width of this div element since the width of the 'CSS div element width parameter' would overrule this -
(6) Display gallery name:
(No/Yes) Do display gallery name below the gallery thumbnail
-
(7) Display date:
(No/Yes) Do display gallery date below the gallery thumbnail
-
(8) Date format:
Select format type the date should display (for example, d-m-Y | d/m/Y | m-d-Y : G-i). See http://nl3.php.net/date for more info about this.
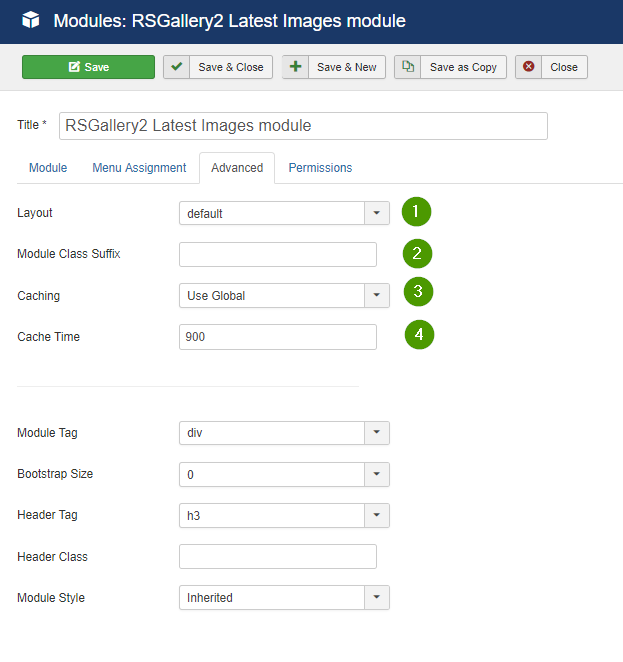
Tab Advanced
Support of standard joomla! function (May be prepared but not implemented) <! Todo: find Joomla description for this --> More on "mouse over"
-
(1) Layout
-
(2) Module Class Suffix
-
(3) Caching
-
(4) Cache Time
RSG2_Modul_LatestImages
The RSGallery2 Module LatestImages shows as the name suggests the latest created images from RSGallery2 galleries.
- The images are shown in a table view. The number of rows and columns define the the number of images displayed.
- The administrator can specify certain galleries as source for the images to show. Sub galleries may be included.
- The administrator can select a display type, if the thumb-, the rsgallery2- or the original size of the image shall be used as a source for the display.
- The display width of the image and the surrounding
divmay be set. - The name of the gallery and the date of the image may be displayed.
- A click on the image may lead to
- The parent gallery
- Gallery single image view
- Gallery slideshow view
- Original image
- Gallery display image
- Gallery thumb image
General
- User defined number of images are selected and shown like in the RSGallery2 gallery view.
- The images may be aligned in row and columns.
- The sources to look for the images are all galleries or a defined list of galleries.
- The displayed image size may may origin from the thumb-, the orginal- or the rsgallery display size.
- The resulting set may be "garnered" with CSS styles set in the backend.
- Each image may lead to the origin picture or the parent gallery or ...
Parameter in backend
Tab Modul

-
(1) Number of rows
Number of vertical images (Images per column)
-
(2) Number of columns
Number of horizontal images (Images per row) The number of displayed images is the result from
Count = row number times column number. ThereforeCountimage names are fetched from the Database and prepared for the display -
(3) Select galleries to show images from
e.g. 3,8,42. The used galleries may be restricted to a selection. Please use a comma separated list. Select galleries to show images from where multiple galleries are separated by a comma, e.g. '3,8,42' or '5'. If you want to show images from all galleries enter '0'. The access level of user will be taken into account, so if a user is not allowed to see gallery 2 its images won't show even if you put it here.The gallery id numbers to use can be found here: Backend > Components > RSGallery2 > Galleries, in the column ID
-
(4) Include sub galleries: (No/Yes)
When the range of galleries is limited by user input (see above) the child galleries may be included in the image search
-
(5) Display type of image to show
RSGallery2 stores the original (depending on settings), a display sized image and a thumbnail sized image. User can select which display type is to be used.

-
(1) CSS img element height parameter:
Enter the size of the CSS height attribute of the image to show in pixels. If '0' is entered there won't be a height specified for img element and the actual height of the image will be taken.
-
(2) CSS img element width parameter:
Enter the size of the CSS width attribute of the image to show in pixels. If '0' is entered there won't be a width specified for img element and the actual width of the image will be taken CSS width attribute for the img and the div element (0=no attribute) Set size of image, use one (!) of height or width to make the image smaller. Set one or both settings for image height and width to 0, this will keep the aspect ratio of the image, if you set a size for both the image will be stretched. Do not set the size larger than the actual image size, e.g. when a thumb size image has a size of 50x50 pixels, don't set either size to larger than 50, rather use the larger display or the original image
-
(3) CSS div element height parameter:
Set size of div, use this to crop the image. Enter the size of the CSS height attribute of the div that holds the image in pixels. This will crop the image. If '0' is entered there won't be a height specified for the div element and it will fit the actual height of the image
-
(4) CSS div element width parameter:
Set size of div, use this to crop the image. Enter the size of the CSS width attribute of the div that holds the image in pixels. This will crop the image. If '0' is entered there won't be a width specified for the div element and it will fit the actual width of the image
-
(5) CSS div element height parameter for name of image:
CSS div element height parameter for name of image. Enter the size of the CSS height attribute of the dive that holds the name of the image, in pixels. If '0' is entered there won't be a height specified for the div element. There is no width parameter to set the width of this div element since the width of the 'CSS div element width parameter' would overrule this
-
(6) Display image name:
(No/Yes) Do display image name below the image
-
(7) Display date:
(No/Yes) Do display image date below the image
-
(8) Date format:
Select format type the date should display (for example, d-m-Y | d/m/Y | m-d-Y : G-i). See http://nl3.php.net/date for more info about this
-
(9) Link image to view type
A click on the image shall link to the selected type. Single image/gallery view: The display area will be found in the first joomla menu linking to RSGallery2 galleries Possible options
- Don't link image to anything
- Link to standard gallery view
- Link to single image view of gallery
- Link to slideshow view of gallery
- Link to original image (user) size
- Link to display image (RSGallery2) size
- Link to thumb image (RSGallery2) size
Tab Advanced
Support of standard joomla! function (May be prepared but not implemented)
More on "mouse over"
(1) Layout
(2) Module Class Suffix
(3) Caching
(4) Cache Time
RSGallery2 Module RandomImages
The RSGallery2 Module RandomImages shows as the name suggests some random images from RSGallery2 galleries.
- The images are shown in a table view. The number of rows and columns define the the number of images displayed.
- The administrator can specify certain galleries as source for the images to show. Sub galleries may be included.
- The administrator can select a display type, if the thumb-, the rsgallery2- or the original size of the image shall be used as a source for the display.
- The display width of the image and the surrounding
divmay be set. - The name of the gallery and the date of the image may be displayed.
- A click on the image may lead to
- The parent gallery
- Gallery single image view
- Gallery slideshow view
- Original image
- Gallery display image
- Gallery thumb image
General
- User defined number of images are selected and shown like in the RSGallery2 gallery view.
- The images may be aligned in row and columns.
- The sources to look for the images are all galleries or a defined list of galleries.
- The displayed image size may may origin from the thumb-, the orginal- or the rsgallery display size.
- The resulting set may be "garnered" with CSS styles set in the backend.
- Each image may lead to the origin picture or the parent gallery or ...
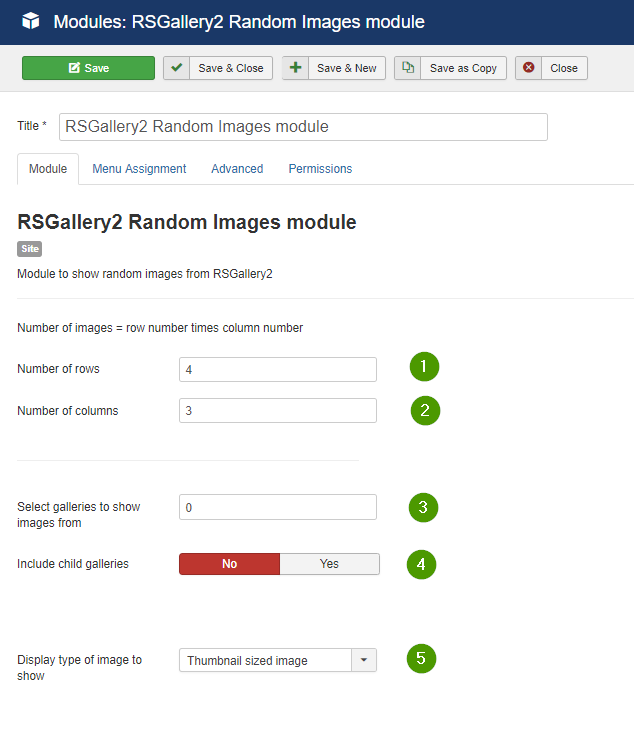
Parameter in backend
Tab Modul
-
(1) Number of rows
Number of vertical images (Images per column)
-
(2) Number of columns
Number of horizontal images (Images per row) The number of displayed images is the result from
Count = row number times column number. ThereforeCountimage names are fetched from the Database and prepared for the display -
(3) Select galleries to show images from
e.g. 3,8,42. The used galleries may be restricted to a selection. Please use a comma separated list. Select galleries to show images from. Multiple galleries are comma separated, e.g. '3,8,42' or '5'. If you want to show images from all galleries enter '0'. The access level of user will be taken into account, so if a user is not allowed to view gallery 2 its images won't show even if you put it here.The gallery id numbers to use can be found here: Backend > Components > RSGallery2 > Galleries, in the column ID.
-
(4) Include sub galleries: (No/Yes)
When the range of galleries is limited by user input (see above) the child galleries may be included in the image search
-
(5) Display type of image to show
RSGallery2 stores the original (depending on settings), a display sized image and a thumbnail sized image. User can select which display type is to be used.

-
(1) CSS img element height parameter:
Enter the size of the CSS height attribute of the image to show in pixels. If '0' is entered there won't be a height specified for img element and the actual height of the image will be taken.
-
(2) CSS img element width parameter:
Enter the size of the CSS width attribute of the image to show in pixels. If '0' is entered there won't be a width specified for img element and the actual width of the image will be taken CSS width attribute for the img and the div element (0=no attribute) Set size of image, use one (!) of height or width to make the image smaller. Set one or both settings for image height and width to 0, this will keep the aspect ratio of the image, if you set a size for both the image will be stretched. Do not set the size larger than the actual image size, e.g. when a thumb size image has a size of 50x50 pixels, don't set either size to larger than 50, rather use the larger display or the original image
-
(3) CSS div element height parameter:
Set size of div, use this to crop the image. Enter the size of the CSS height attribute of the div that holds the image in pixels. This will crop the image. If '0' is entered there won't be a height specified for the div element and it will fit the actual height of the image
-
(4) CSS div element width parameter:
Set size of div, use this to crop the image. Enter the size of the CSS width attribute of the div that holds the image in pixels. This will crop the image. If '0' is entered there won't be a width specified for the div element and it will fit the actual width of the image
-
(5) CSS div element height parameter for name of image:
CSS div element height parameter for name of image. Enter the size of the CSS height attribute of the dive that holds the name of the image, in pixels. If '0' is entered there won't be a height specified for the div element. There is no width parameter to set the width of this div element since the width of the 'CSS div element width parameter' would overrule this
-
(6) Display image name:
(No/Yes) Do display image name below the image
-
(7) Display date:
(No/Yes) Do display image date below the image
-
(8) Date format:
Select format type the date should display (for example, d-m-Y | d/m/Y | m-d-Y : G-i). See http://nl3.php.net/date for more info about this.
-
(9) Link image to view type
A click on the image shall link to the selected type. Single image/gallery view: The display area will be found in the first joomla menu linking to RSGallery2 galleries Possible options
- Don't link image to anything
- Link to standard gallery view
- Link to single image view of gallery
- Link to slideshow view of gallery
- Link to original image (user) size
- Link to display image (RSGallery2) size
- Link to thumb image (RSGallery2) size
Tab Advanced
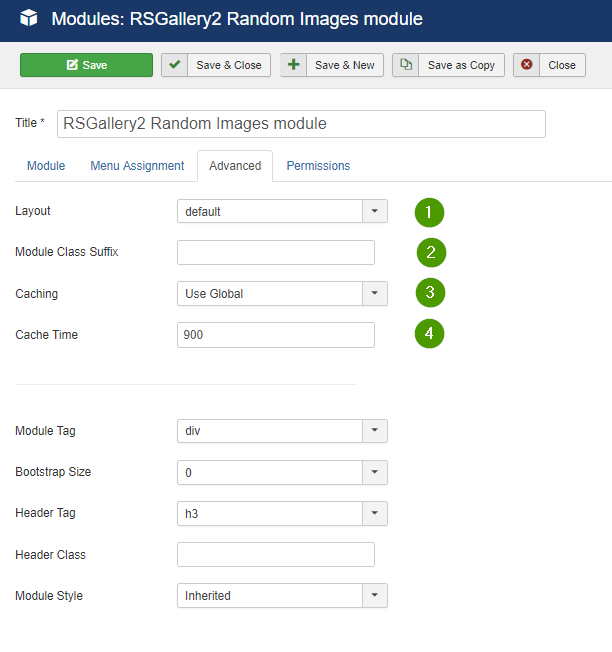
Support of standard joomla! function (May be prepared but not implemented)
More on "mouse over"
-
(1) Layout
-
(2) Module Class Suffix
-
(3) Caching
-
(4) Cache Time
Modul ThumbScroller
#RSGallery2 thumb scroller module The RSGallery2 Module thumb scroller shall scroll selected thumbnails from RSGallery2 images
It is in development (2015.09) (still in 2019.05) so anything below is just a note for myself of found pieces and bits
ToDo: Check if needed , check following links -> separate template ?
https://en.wikipedia.org/wiki/Marquee_element replace Marquee element -> http://www.w3.org/TR/html5/obsolete.html#the-marquee-element-0 https://drafts.csswg.org/css-animations-1/ https://drafts.csswg.org/css-transitions-1/
"rsscroller_thumb" http://manos.malihu.gr/repository/jquery-thumbnail-scroller/demo/examples/demo.html# http://manos.malihu.gr/jquery-thumbnail-scroller/
.rsscroller_thumb {text-align:center;} .rsscroller_thumb img{ border:0; padding:3px;}
       <H3>Galer=EDa de Fotos </H3>
        <STYLE type=3Dtext/css>.rsscroller_thumb {
TEXT-ALIGN: center
} .rsscroller_thumb IMG { BORDER-TOP-WIDTH: 0px; PADDING-RIGHT: 3px; PADDING-LEFT: 3px; = BORDER-LEFT-WIDTH: 0px; BORDER-BOTTOM-WIDTH: 0px; PADDING-BOTTOM: 3px; = PADDING-TOP: 3px; BORDER-RIGHT-WIDTH: 0px }
        <DIV class=3Drsg2_scroller=20
        style=3D"OVERFLOW: hidden; POSITION: relative">
        <MARQUEE onmouseover=3Dthis.stop() onmouseout=3Dthis.start() =

        scrollAmount=3D2 scrollDelay=3D50 direction=3Dright =
width=3D"100%"=20 height=3D150>
Finish it for good
How to remove RSGALLERY2 completely
(1) Use Maintenance -> Purge tables
This removes the database content and the image files
(2) Prepare the remove of database table structure
Search in admin rsgallery2 folder \administrator\components\com_rsgallery2\sql\ for file uninstall.mysql.utf8.sql. Edit the file and remove the comments in front of the drop commands.
(3) Standard uninstall
Use finally standard Joomla uninstall to get rid of all parts of RSGallery2